How To Connect A Konica Minolta Printer to a Computer? (Windows, macOS, And Linux)
Every business, whether small or large, has one thing in common; all of them have printing requirements on a daily basis. However, if we specifically talk about small businesses, Konica Minolta printers are highly popular among them. The primary reason why growing businesses love using this brand of printers is that they're easy to use and don't cost too much.
In addition, Konica Minolta printers offer high-quality copying, quick printing, PDF scanning, and color laser printing. They also come with the latest advanced features for cloud and network printing. Moreover, generally, teams love using this printer. Its user-friendly, cost-effectiveness, and easy management make it the perfect printer for small and growing businesses.
So, if you have purchased a Konica Minolta printer recently, you may find it hard to connect it to your computer if you don't have any prior knowledge. However, worry not, as Printertales is here to direct your effort in the right way. Learn how to connect a Konica Minolta printer to a computer with this comprehensive guide!
Getting Your Computer Ready To Connect It With A Konica Minolta Printer
Before you start connecting a Konica Minolta printer to your computer, there are a few things you should know about, such as your device's operating system. Follow these steps to learn about the computer's operating system:
- Firstly, in your Windows search box, type in “PC.”
- Then, from the on-screen list, select the "This PC" option.
- Next, in the new window, right-click on the "This PC" tab present in the left column.
- After that, from the menu, click the "Properties" button.
Now, the information you'll find right under "Windows edition" will tell you the version of Windows on which the computer is running. While on the other hand, the "System" heading has the details on the Windows version, i.e., 64-bit operating system.
So, now let's look at the setting up process of a Konica Minolta printer to connect it to your computer.
Downloading The Driver
The first step of setting up your printer includes downloading the right drivers. For this, you must visit https://onyxweb.mykonicaminolta.com/OneStopProductSupport? and look for your printer drivers from the search bar.
- Firstly, enter the Konica Minolta printer model you're connecting to the computer in "Category" or “Quick Search.”
- Then, tap on "Drivers," select your operating system and then hit “Search.”
- Next, tap to select the "PCL" driver and then select the recent driver.
- Finally, hit "Ok" to save the driver.
Installing The Driver
Now, once you've downloaded the driver, you must double-click the ".zip" file in order to download it to the computer. After that, your computer will be able to locate the IP address of the printer. Make sure to follow all the on-screen prompts to add it successfully.
Configuring The Computer
The final step involves configuring your printer with the computer. You should follow these steps after you install the correct driver on your computer.
- Firstly, tap "Start" and select "Devices and Printer." Or, head to "Start," search for "Control Panel," and select “Devices and Printers.”
- Then, right-click on your printer from the list and select “Printer Properties.”
- Next, tap on the "Advanced" tab.
- After that, press the "Printing Defaults" option.
- Moreover, for PCL drivers, this later connects you to “My tab.”
- Now, next to the "Favorite Settings" tab, hit the down arrow and select “Gray Scale.”
- Finally, press the "Apply" button and hit "Ok."
Connecting A Konica Minolta To Your Computer For Printing
So, in the previous section, we discussed how you can set up your Konica Minolta printer for your computer. Now, as you know, this printer is regarded as an all-in-one printer and is easy to connect to computers. Konica Minolta printer isn't just about scanning and copying documents; you can also use it to print high-quality documents. You can connect this printer to your computer using a USB cable or Ethernet.
While the Konica Minolta printer has its own software, you may prefer using the built-in printer installer that comes with Windows. This will help set up the printer for basic printing. However, if you're looking to use advanced options, you must install the software this printer comes with.
- Firstly, plug the printer into the USB port of the computer.
- Then, make sure to close all the programs running on your computer.
- Next, head toward the "Charms bar" and click “Settings.”
- After that, enter "dev" in the search field and press “Settings.”
- Now, select the "Drives and Printers" option to open the list of printers.
- Then, right-click on the printer you're using and tap “Printer Properties.”
- Next, hit the "Configure" tab and confirm if the options are correct. In case you find that wrong, tap "Acquire Device Information" in
- order to configure the printer settings. Also, choose the driver options to install them manually.
- Now, press the "Apply" button. In case that button isn't available, hit the "General" tab and select "Print Preferences" in order to open the dialog box. Also, choose the default settings for your printer.
- Finally, hit the "Apply" and "Ok "buttons on both the Properties and Print Preference dialog boxes
With this, your Konica Minolta printer is successfully connected to your computer.
Setting Up A Konica Minolta Printer On Your Mac Device
Well, Mac devices have their own charm and unique set of features that make them stand out from Windows devices. However, using such a device also means that things will be a bit or a lot different from any average Windows device. And sometimes, setting up a device like a printer on a macOS can be complicated. As you may know, the preferences aren't the same as on Windows in the Apple menu.
While the process of setting up a Konica Minolta printer on a Mac seems like a complicated process at the start, in reality, it isn't if you break all the steps into pieces. So, what exactly are we talking about? Well, here are the steps you need to follow to set up your printer on a Mac device.
Step 1: Know Your OS
First, you must know what OS you're using; however, if you're unaware of what operating system you're running, worry not! You can move to the second step for those who know their OS, while others must follow these steps to understand their OS.
- Firstly, head toward the “Apple Menu.”
- Then, tap on “About This Mac.”
- Once you click on that, your computer screen will show what OS you're running.
Make sure you remember this, as it will be required when downloading drivers in the next step.
Step 2: Download The Drivers
Now, the next step involves downloading printer drivers if you don't have them already. To download these drivers, click on "http://onyxweb.mykonicaminolta.com/OneStopProductSupport/." When you're on this page, you'll need to enter the first few characters of your printer. However, if the correct results aren't on your screen, try entering only the number. This way, more results will appear for the driver.
Next, click on the "Drivers" tab and continue scrolling until you find the correct driver for your Mac OS. After that, press the "Download" button.
Step 3: Install The Drivers
So, once you finish downloading the drivers, follow these steps to install them:
- Firstly, double-click on your downloaded printer driver file.
- Then, this file will be unzipped and will be found in your system's "Downloads" folder.
- Next, when it gets open, double-click on the ".pkg installer" file.
- After that, just follow the on-screen instructions to run through the process.
- Moreover, ensure to accept all the defaults during the driver installation process.
- Finally, when the prompt appears on your screen, type in your password to the computer.
Step 4: Configure Your Printer
Now, the final step of setting up a Konica Minolta printer on a Mac involves configuring the printer. You need to get your printer recognized by your computer. And for this, you must add the device manually after downloading and installing the driver:
- Firstly, head to the "Apple menu" and scroll down to the "System Preferences" section. Then, look for “Printers & Scanners.”
- Next, select your printer from this list and tap the "add" sign on the left side of the printer's name.
- After that, find the "IP" tab with a globe sign. If you have a particular network address to type in, this is where you'll enter it. Or, you can select a network from the connection methods.
- Now, you'll find an unchecked box next to "Use." You need to check that box and click on “Select Software.”
- Finally, search for your printer model and tap on it. Then, hit "OK." This will add the attachments that come with the printer driver.
- Now, tap "Add," allowing you to make changes or select the default settings.
- However, suppose you're unsure about your printer's functioning and network connection specifics. In that case, it's best to leave everything on the default settings with the driver installation.
Installing A Konica Minolta Printer On A Mac Device
Let's look at how you can install your Minolta printer on a Mac Device quickly.
- Firstly, head to the "Apple menu" and scroll down to the "System Preferences" section. Then, look for “Printers & Scanners.”
- Next, select your printer from this list and tap the "add" sign on the left side of the printer's name.
- After that, find the "IP" tab with a globe sign. If you have a particular network address to type in, this is where you'll enter it. Or, you can select a network from the connection methods.
- Now, you'll find an unchecked box next to "Use." You need to check that box and click on “Select Software.”
- Finally, search for your printer model and tap on it. Then, hit "OK." This will add the attachments that come with the printer driver.
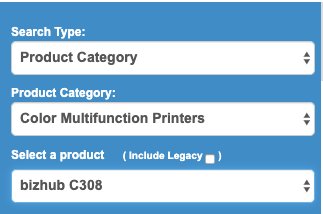
- Moreover, from the right side, select the "Drivers" option.

- Now, from the list of operating systems, choose your Mac OS.
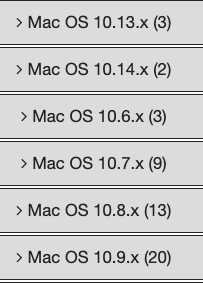
- Then, tap on the Mac Driver link. You'll be shown a line of printer model numbers, and all of them will end in ZIP.

- Next, open the "Downloads" folder and the Zip file you previously downloaded.

- After that, a folder will be created and go by the "Driver" name. Click on that folder and open "OS_10_9_x" and "A4," respectively.
- Now, double-click on the "PKG" file, which you'll find in the A4 folder. Once you click on that, the installer for the printer driver will be launched.
- Then, press the "Continue" button on the installer. You'll have to tap this "Continue" button multiple times.
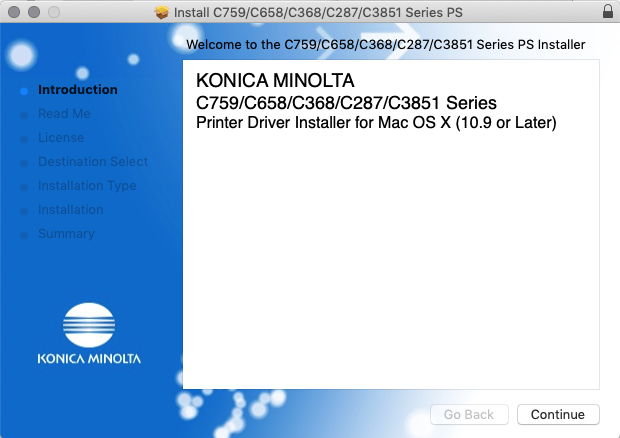
- Next, once the "Agree" button appears, click on it. Then, hit the “Install button.”
- If it asks you to type in your Mac password, ensure to do it.
- Once the installation ends, click the "Close" button.
- After that, you'll perform the step of adding your printer to the Mac device.
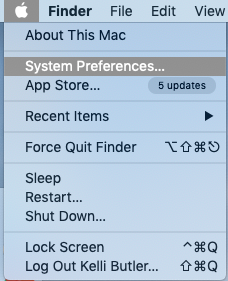
- For this, tap the Apple icon from the upper left, and select “System Preferences.”
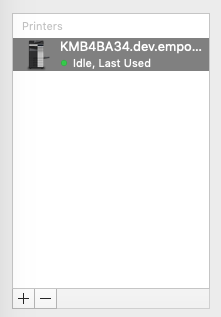
- Now, select "Printers & Scanners" and tap the "+" icon to add your printer.
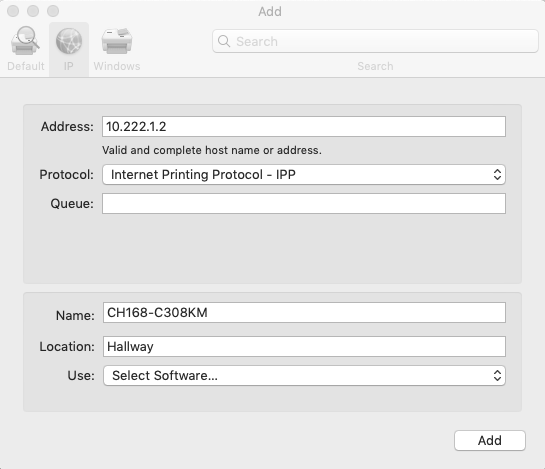
- Moreover, tap on the "IP" tab. In the "Address" section, type in your printer's IP address, which you'll find on its label. Also, type in your printer name in alphanumeric. You can find this on your printer, which will come with a combination of printer model and room number.
- Next, if you want, you can type in the location of your printer.
- After that, in the "Use" section, choose “Select Software.”
- Then, click on your printer model number from the on-screen list and hit "OK." Then, tap “Add.”

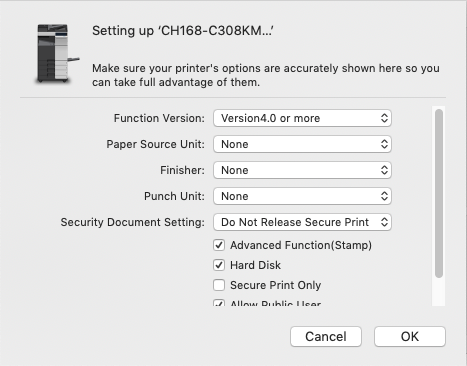
- Next, from the options screen, select the options your printer may have installed. However, if you're unsure about them, leave those sections on default, as you can modify them later. Finally, the Konica Minolta printer will appear on your printer list once the installation ends.
Also Read: How to connect HP Printer to Wi-Fi | Printer Tales
Konica Minolta Printer Drivers for Windows 7/8/10/11
You're now well aware of how you connect a Konica Minolta printer to a computer. However, you may face printing issues while using your printer. That's why you must keep your printer driver updated.
But if you don't know how to download or install these drivers on your Windows computer, worry not. Try the following steps to run the latest printer drivers on your Windows devices.
Downloading and Installing The Driver
Konica Minolta regularly updates its drivers for its printer series. You'll need to visit its official website to find and download the latest drivers for your operating system. This process can be time-consuming, and you may even make some errors while following it. So, make sure to follow these steps carefully:
- Firstly, head to Konica Minolta's download center.
- Then, choose the product model.

- Next, tap “Drivers.”

- After that, from the dropdown, select the operating system.
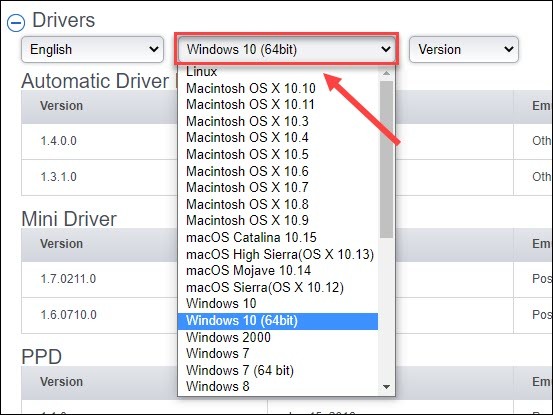
- Finally, tap the "Download icon" right next to the driver you want to download.

Now, after you finish downloading the driver, you need to double-click on the downloaded file. Once you click on it, you can launch the setup file. Just follow all the on-screen instructions to install the drives.
How To Install A Konica Minolta Printer On Linux?
If you're using Linux, the process of connecting a Konica Minolta printer to your computer can be different. Here is what you need to do:
- Firstly, install the drivers by visiting "https://onyxweb.mykonicaminolta.com/OneStopProductSupport?appMode=public&productId=1622&categoryId=1&subCategoryId=ft0."
- Next, open "Files" and select “Connect to Server.”
- Then, type in "smb://printserv01.cs.stonybrook.edu/drivers" right next to "Server Address" and tap on “Connect.”
- After that, enter your credentials.
- Now, press the "KMC554E Folder" and tap on the "Linux Driver Folder." Also, select the CUPS version you're currently using.
- Moreover, press the "EN" folder and copy "KOC554UX.ppd" to your desktop.
Now comes the main installation step:
- Firstly, open your "System Settings" and tap “Printers.”

- Then, hit the "Add" button.

- Next, expand your "Network Printer" and click on “Windows Printer via SAMBA.”
- After that, next to "smb://" enter "printserv01.cs.stonybrook.edu/PR254-KMC554E" for the printer in room 254.
- Now, for room 203A, enter “printserv01.cs.stonybrook.edu/PR203A-KMC554E.”
- Moreover, select “Set Authentication details now.”
- Then, type in your credentials.
- Next, tap the "Forward" button after entering them.
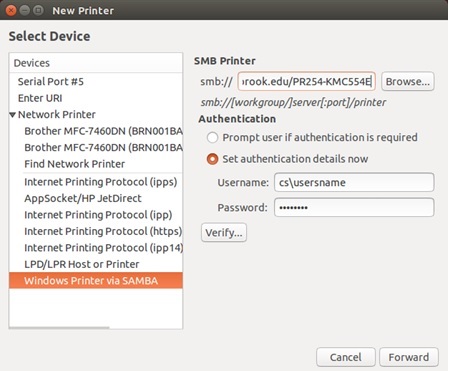
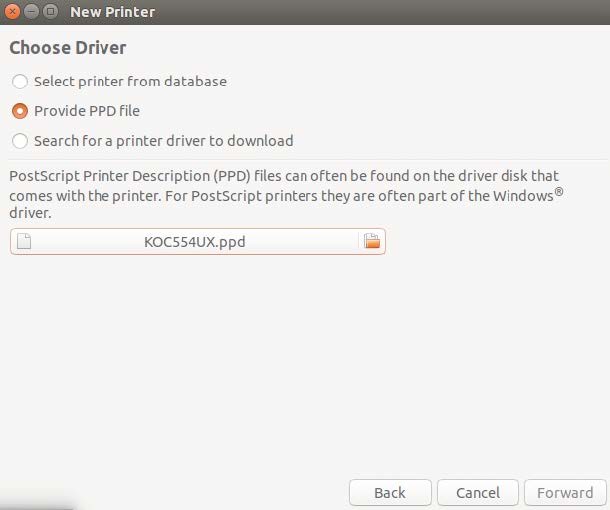
- After that, select the "Provide PPD File" option. Also, browse for the "KOC554UX.ppd" file on your desktop where you saved it. Then, hit the "Forward" button.
- Moreover, under the "Finisher" dropdown, choose the FS-535 option. Furthermore, under the "Punch Z-Fold unit" dropdown, you must select the "PK-521 (2/3 Hole)" option. Then, hit “OK.”

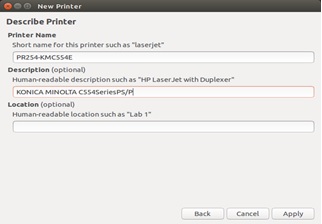
- Now, for the machine that is in room 254, change your printer name to "PR254-KMC554E." Or, for the machine in room 203A, enter the name "PR203A-KMC554E." Then, tap on the "Apply" button to successfully have access to your printer through your computer.
Conclusion
So, this is how you connect a Konica Minolta printer to a computer. It doesn't matter whether you're using Windows, macOS, or Linux, the process of installing drivers and setting up the printer is somewhat similar. Through this guide, we tried to make the process of adding a Konica Minolta printer to a computer as simple as possible. However, if you face difficulties while performing this installation process, don't hesitate to seek professional help such as Printer Tales.

