How to Connect Brother Printer to WiFi? [A Complete Guide]
For your newly bought printing system, get to know “how to connect Brother printer to WiFi” here. If this is your first time, the process of setting up your machine can be complicated. However, it is no big deal if you got the correct steps to help you through the procedure.
When it comes to connecting a printing system to a WiFi network, different types of configurations are required. For instance, in order to operate a printing machine, you must install it on the list of devices. In addition, a connection process is incomplete without the driver installation. It helps your PC to communicate with the printer.
So, let’s get started with this complete guide, from essential tips to installation instructions.
What To Do Before Setting Up Brother Printer?
You must understand a few things for connecting a Brother printer to WiFi.” Below are the formatting requirements for the WiFi setup.
- Check if it has a Network Name (also known as "SSID" or "ESSID")
- Ensure the WiFi settings are correctly configured on the system.
- Make sure to check the base station of the wireless router.
- Ensure to go through the user manual provided with the WiFi router.
Install Brother Printer Driver on the System
After meeting all the requirements mentioned above, start with the first step towards setting up the device to a wireless network. A printer driver is a software that allows communication between the Brother machine and the PC.
It is required for your PC to transfer the print jobs to the machine. So, you will need to attempt the instructions listed below for your Mac or a Windows OS. Follow the below instructions to download the software on Windows and Mac.
Windows OS
If you are a Windows user, you must follow the below instructions to get the software and install it on the system.
- Firstly, open the Windows system.
- Then, go to a web browser.
- Navigate the official Brother website.
- After that, tap the download link.
- Now, go to the Download section.
- In the Download section, look for your model.
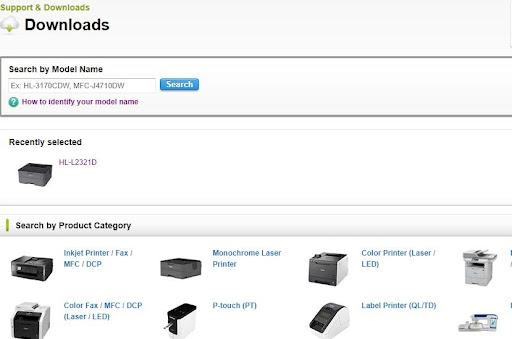
- You can also locate your model by the Product category.
- Now, choose an operating system you are using.
- Then, locate the latest driver version.
- Download the driver after that.
- Lastly, install it with the help of the on-screen prompts.
Mac OS
If you are working with a Mac device, use the below steps to download and install the Brother software.
- On your Mac system, open a web browser.
- Then, navigate to the official Brother site.
- Go to the Download section on the following page.
Read Also:- Brother Printer in Error State: 7 Simple Methods To Fix It
- Then, download the full software package.
- If the Full Software Package is not visible, download a driver.
- Double-click on the downloaded printer software file.
- You can find the installation instructions on the Download page.
The first step towards connecting the Brother machine to the WiFi network is complete. Now, you need to step ahead with the procedure to make the connection.
How to Connect Your Brother Printer to WiFi Network?
After installing the software, you can connect the printer to WiFi. Regardless of your operating system, the instructions below will successfully set up the machine on the wireless network. To do it properly, keep both devices on the same network.
- Firstly, connect the power cable to the electric socket.
- Then, you need to power up the printing device.
- Next, go to the control panel and press the Menu button.
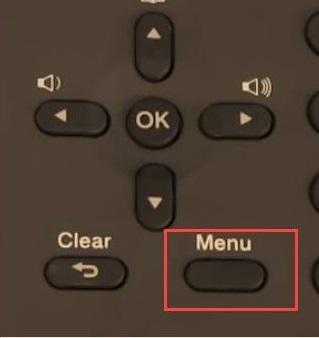
- On the control panel, use the down and up arrows.
- Then, select the WLAN option.
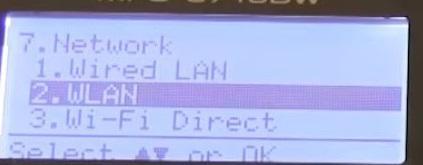
- In the next step, click the OK button.
- After that, use the up and down arrow keys.
- Now, you need to select the Setup Wizard option.
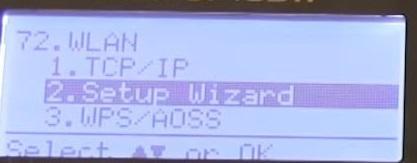
- Tap the OK button in the next step.
- On the WLAN Enable screen, select the ON option.
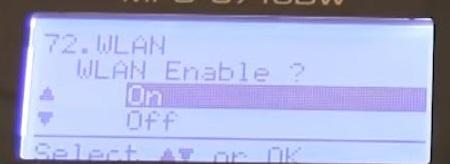
- Now, it will enable the wireless connection.
- Then, the device will search the available network.
- Use the up and down keys and navigate to the SSID section.
- Next, choose the SSID you want to use.
- Provide the network key when prompted.
- After that, tap the OK button to proceed.
- Now, the machine will automatically connect to WiFi.
- When the printer sets the connection with the WiFi:
a. It will display "Connected" on the screen.
How to Connect Brother Printer to Wireless Network (WPS)?
If the WiFi access point/router you are using has a WPS feature, the wireless connection cannot be any easier. Here is how to connect the printing device wirelessly.
- First, check that the WiFi access point contains the WPS button.
- Set your Brother machine within your access point/router range.
a. The range sometimes differs according to the environment.
b. Check the instructions delivered with your router. - Click the WPS button on the router after that.
- Next, tap the WiFi button and hold it for at least 5 seconds.
- The WiFi indicator on the machine will flash every second (Blue).
- After establishing the connection, the WiFi indicator shows a “Blue” indicator.
- PCs and mobile devices will now have access to the same network.
We have gathered the easy steps to connect your printing system to a wireless network. However, if you find it complicated or have never dealt with it, it would be wise to contact professionals. If you require, connect with Printer Tales experts and let them handle all your printer-related queries. You can call us at +1-877-469-0297 or +44-800-054-8150. We are also available for assistance via info@printertales.com.
Frequently Asked Questions
How to connect Brother printer to WiFi using Windows?
If you have a wireless printer connected to a WiFi network, ensure the WiFi signal is strong. Try to bring the printer closer to the WiFi router to boost WiFi signal strength. An incorrect setting can also be why the printer does not connect to Windows PC. You must also check the configuration settings of the WiFi network or the router.
What are the vital steps to connecting the Brother printer to a WiFi network?
Firstly, switch on the printer, system, and WiFi router. Go to the WiFi Setup option from the printer's control panel to start setting up the printer to WiFi. Select the network name or the SSID and type the password for the same. It will authenticate the password and connect the printer to WiFi.
My computer is unable to recognize the Brother printer. What can I do?
From the Start option, go to the Settings and then Bluetooth and Devices. After that, go to the Printers and Scanners window. Select the Add option and the "Add a printer or scanner" option. Add your printer and check if the computer can recognize the printer or not.

