Brother HL-L2460DW WiFi Setup Guide: 3 Ways (With Fixes)

Quick Answer: Connect in Under 2 Minutes
The fastest path: press Menu → Network → WLAN (Wi-Fi) → Setup Wizard on the printer's LCD panel, select your network name, enter your WiFi password, and press OK. The LCD will show [Connected] when done. Then download drivers from support.brother.com/downloads and you're printing wirelessly. No USB cable needed for this method.
The Brother HL-L2460DW is a solid monochrome laser printer — fast, reliable, and genuinely good value. But the initial WiFi setup trips up a surprising number of people because Brother offers three different connection methods, and the right one depends on your router, your OS, and whether you have a USB cable handy. Picking the wrong starting point means wasted time.
This guide cuts straight to what actually works. The steps below are based on Brother's official documentation and hands-on testing, organized so you can pick your method and finish the job in one sitting.
1. What You Need Before Starting
Skipping this prep step is the number-one reason setups fail halfway through. Gather the following before you touch any buttons:
Your WiFi Credentials
SSID (your network name) and Network Key (WiFi password). These are case-sensitive. If you're not sure, check the label on the back or bottom of your router. Most routers print the default credentials there.
The Right Frequency Band
The HL-L2460DW has a dual-band wireless module supporting both 2.4 GHz and 5 GHz (802.11a/b/g/n) — this is confirmed on Brother's own product page. Either band works, so if your router broadcasts both, you can connect to whichever you prefer. The 5 GHz band tends to be less congested and slightly faster for nearby devices; 2.4 GHz has better range through walls. For a desktop printer that sits in one spot, either is fine.
Encryption Type Awareness
This printer supports WPA/WPA2-PSK with AES encryption. WPA2-PSK with TKIP is not supported — if your router is set to TKIP, you'll get a "Connection Failed" error even with the correct password. You may need to log into your router's admin panel and change the encryption to AES.
Printer Placement
During setup, the printer needs a reasonably strong WiFi signal. Set it within 15–20 feet of your router for the initial connection. You can move it after setup is complete.
If you've already tried setting up WiFi before: Reset the printer's network settings first — go to Menu → Network → Network Reset → Reset → Yes. Previous incomplete setup attempts can block a new connection. This is a common issue that isn't documented prominently anywhere.
2. Which Setup Method Should You Use?
Brother gives you three ways to connect. Here's how to pick the right one:
WPS Push Button — Best for routers with a physical WPS button that you can access. Takes about 60 seconds.
Control Panel Wizard — Best when there's no WPS, or the router's WPS is disabled. You type the password on the printer LCD. Takes about 5 minutes.
USB Installer — Best when you want the driver installed in the same session, or prefer typing on a keyboard. Takes about 10 minutes.
Not sure if your router has WPS? Check for a button labeled "WPS" or a button with the WiFi symbol on the back or side of your router. Most modern home routers have it, but many office/business routers and some ISP-provided modems have it disabled by default.
3. Method 1: WPS One-Push Setup (Fastest)
If your router supports WPS Push Button Configuration, this is by far the easiest method. No typing, no password entry — just two button presses.
Step 1 — Turn on the printer and wait for it to be ready
The LCD should show "Ready" before you proceed. The Ready LED should be solid, not blinking.
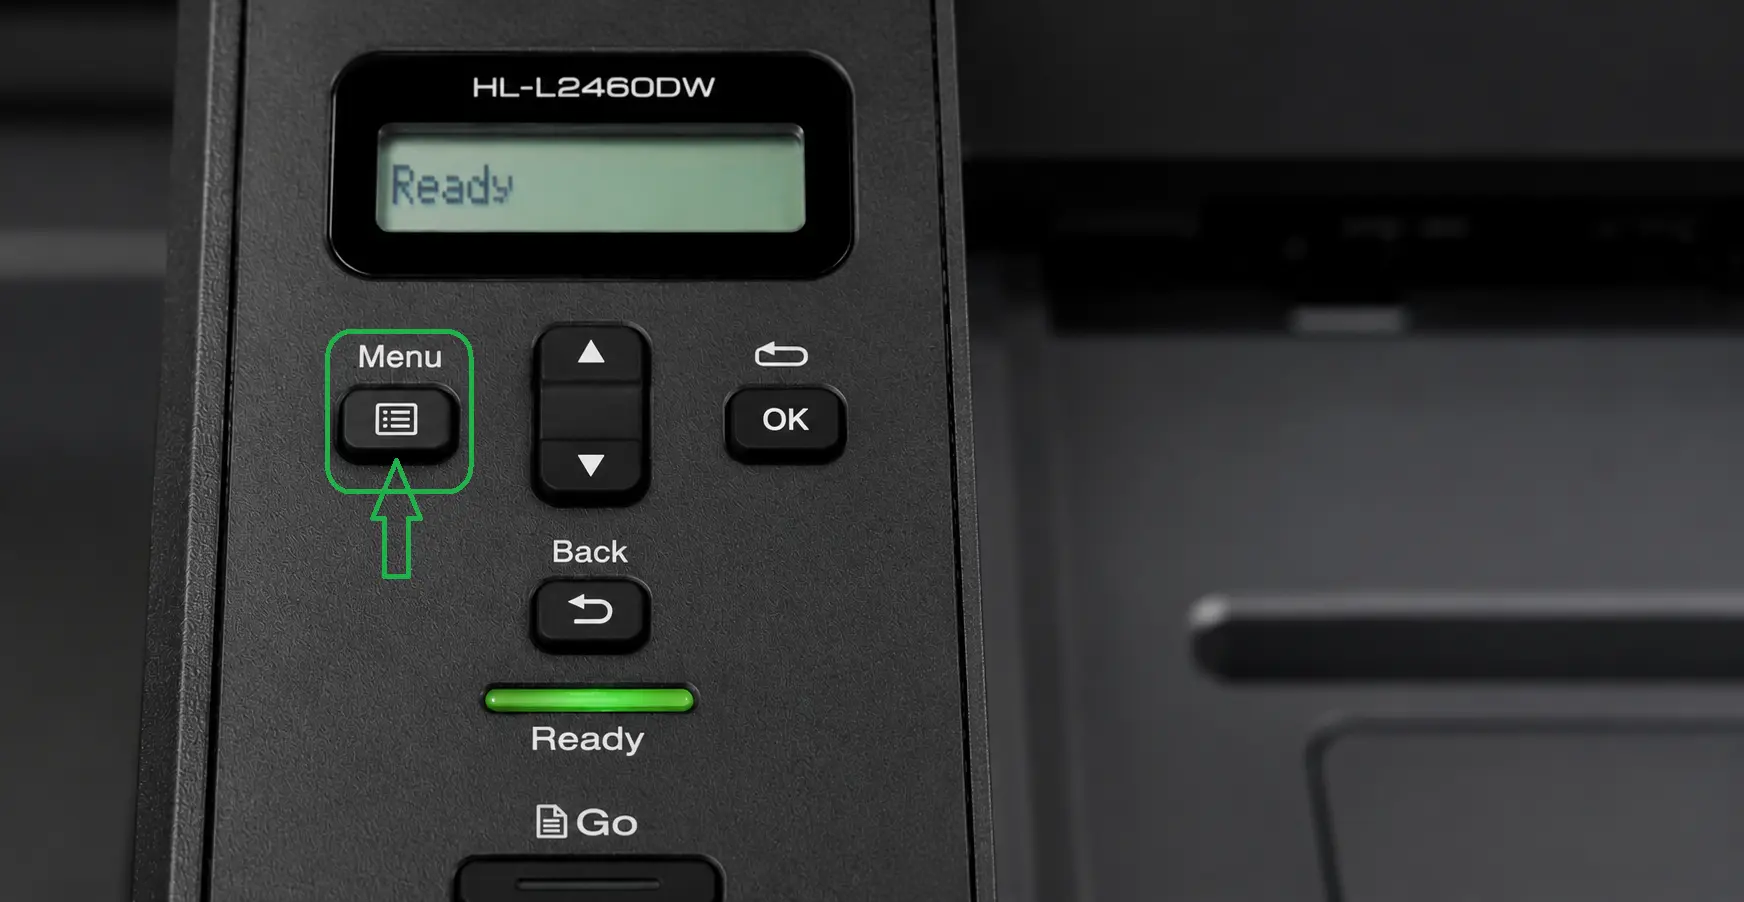
Step 2 — Navigate to WPS on the control panel
Press Menu (the left button below the LCD). Use ▲/▼ to scroll to Network, then press OK. Scroll to WLAN (Wi-Fi), press OK. Scroll to WPS/Push Button, press OK.
Step 3 — Enable WLAN when prompted
If the LCD shows [WLAN Enable?], press ▲ to select On and press OK. This activates the wireless radio on the printer.
Step 4 — Watch for the "Press Key on rtr" prompt
The LCD will display [Press Key on rtr]. This is your two-minute window to press the WPS button on your router.
You have exactly 2 minutes from this point. Don't delay.
Step 5 — Press the WPS button on your router
Hold the WPS button on your router for 1–2 seconds (varies by router model). Your router's WPS indicator light may blink to show it's searching.
Step 6 — Wait for [Connected] on the LCD
The printer will detect the router and negotiate the connection. Within 30–90 seconds, the LCD should show [Connected] and the WiFi LED on the control panel will glow solid (not blinking).
Connected? Print a network configuration report. Hold the Go button for 10 seconds. A report will print showing your IP address and confirmed SSID. Keep this page — you'll need the IP address if you ever want to access the printer's web-based management console.
4. Method 2: Control Panel Setup Wizard (No WPS Required)
This is the most universally compatible method. You'll manually select your WiFi network and enter your password using the printer's navigation buttons. It's slower than WPS but works with any router setup.
Write down your WiFi password first. You'll be entering it character-by-character using ▲/▼ buttons. Having it on paper in front of you saves a lot of frustration with mixed-case passwords.
Step 1 — Open the Network menu
Press Menu → scroll to Network → press OK.
Step 2 — Select WLAN then Setup Wizard
Scroll to WLAN (Wi-Fi) → OK → scroll to Setup Wizard → OK.
Step 3 — Enable WLAN if prompted
If you see [WLAN Enable?], select On and press OK. The printer will scan for nearby networks (this takes 10–20 seconds).
Step 4 — Select your WiFi network from the list
Use ▲/▼ to scroll through the detected SSIDs. Select your 2.4 GHz network name and press OK. If your network doesn't appear, scroll to [New SSID] to enter it manually — this applies to hidden networks.
If your router broadcasts both a 2.4 GHz and 5 GHz network (e.g., "HomeNet" and "HomeNet_5G"), either will work — the HL-L2460DW supports both bands. Pick the 5 GHz band for less congestion if the printer is close to the router, or 2.4 GHz if it's farther away or on a different floor.
Step 5 — Select your authentication method
Most home networks use WPA2-PSK. Select it and press OK. Then select AES as the encryption type.
Step 6 — Enter your WiFi password (Network Key)
Use ▲/▼ to cycle through characters and OK to advance to the next character position. The interface is slow but workable. Press OK when you've entered the full password.
Holding ▲/▼ scrolls faster through the character set. Numbers come before uppercase letters in the scroll order.
Step 7 — Confirm and apply settings
When asked to apply settings, select Yes → OK. The printer will attempt to connect. If successful, the LCD shows [Connected].
Method 3: USB-Assisted Wireless Installer
This method uses a temporary USB cable connection to let your computer configure the printer's WiFi settings automatically. It's the best option if you want the driver installed in the same session or if you're on a corporate/complex network where WPA2 Enterprise is involved.
What you need: A standard USB-A to USB-B cable (the square-ish connector that goes into the printer). USB-B is the same connector used by most desktop printers — very common.
Step 1 — Download the full driver package
Go to support.brother.com/downloads, search for HL-L2460DW, select your operating system, and download the Full Driver & Software Package.
Step 2 — Run the installer and select Wireless Network
Launch the downloaded file. When prompted for connection type, choose Wireless Network Connection. Do not connect the USB cable yet — the installer will tell you when.
Step 3 — Connect USB when instructed
The installer will pause and ask you to connect the USB cable. Plug it in at that point. The software uses the USB connection temporarily to push WiFi credentials to the printer.
Step 4 — Select your network and enter credentials
The installer will show a list of detected WiFi networks. Select your 2.4 GHz SSID and enter your password on screen — much easier than doing it on the printer's LCD.
Step 5 — Disconnect USB when prompted, finish installation
Once the WiFi settings are transferred, the installer tells you to remove the USB cable. The printer will then connect wirelessly, and the driver installation continues automatically over the network.
After this method, your driver is already installed. You don't need a separate driver download step.
6. Installing Drivers After the WiFi Connection
If you used Method 1 or Method 2 (WPS or control panel wizard), you've connected the printer to WiFi but haven't installed any drivers yet. Your computer doesn't know the printer exists. Here's how to finish:
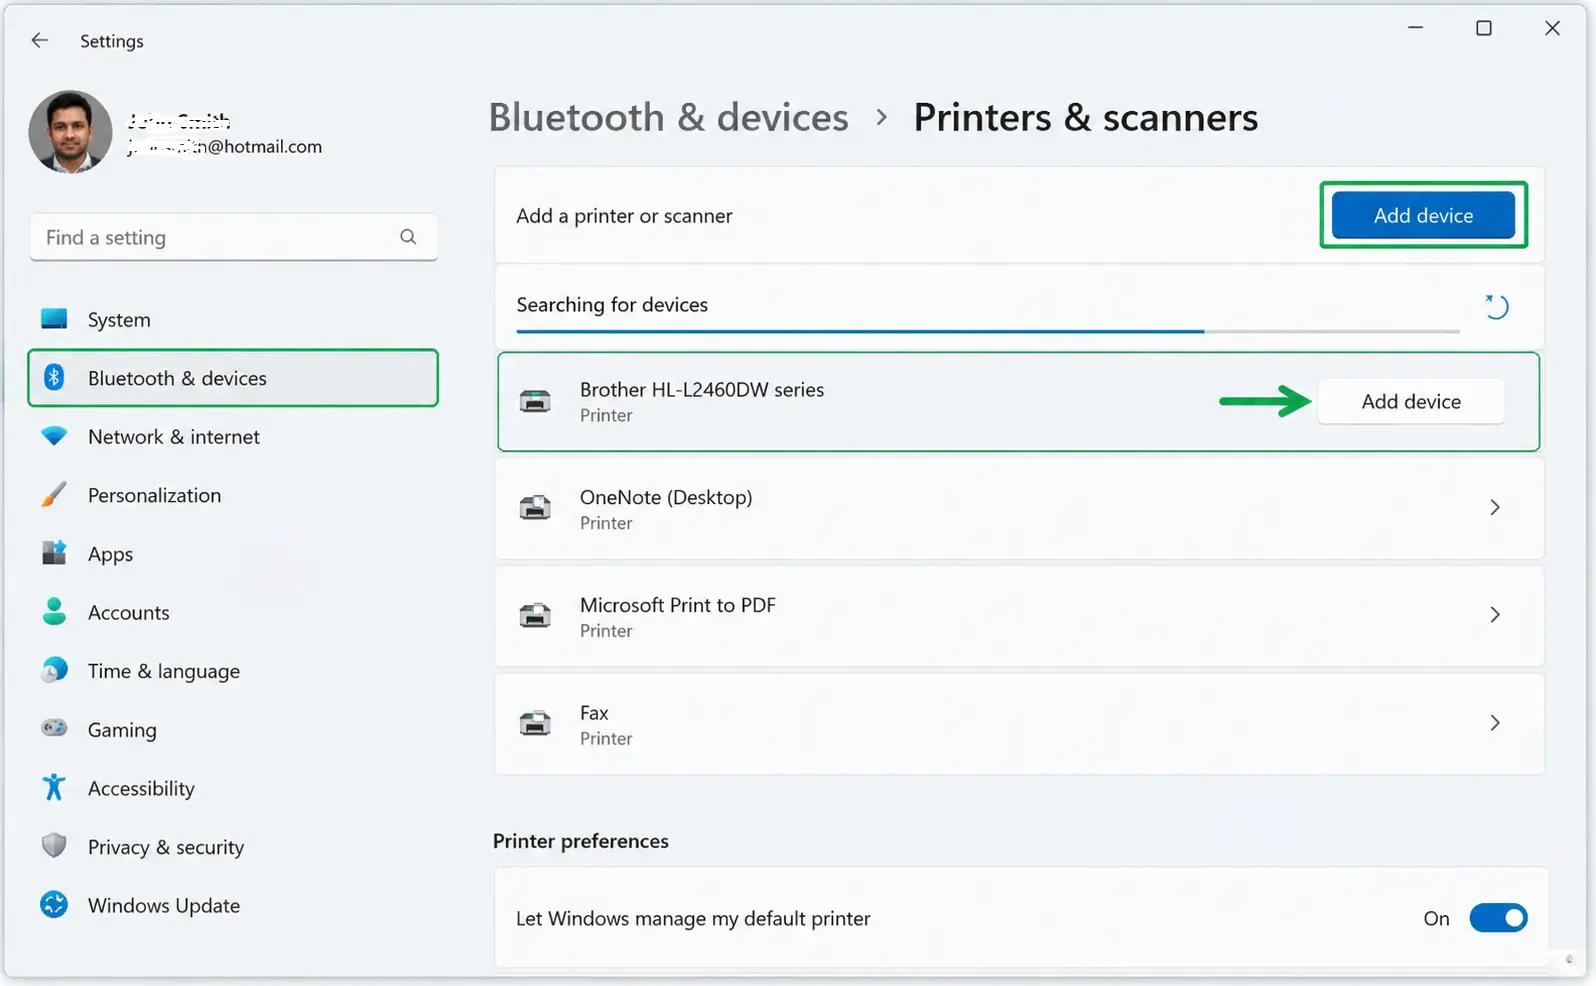
Windows 10 / 11
Go to Settings → Bluetooth & devices → Printers & scanners → Add device. Windows will scan your network. The HL-L2460DW should appear within 30–60 seconds. Click it and select Add device.
If it doesn't appear automatically, click "The printer that I want isn't listed" → select "Add a printer using a TCP/IP address or hostname" → enter the printer's IP address (from the network configuration report you printed earlier).
For full features including printer status monitoring, download the Full Driver & Software Package from Brother's site rather than relying on Windows' generic driver.
macOS
Go to System Settings → Printers & Scanners → Add Printer, Scanner or Fax. Your Mac should auto-detect the HL-L2460DW via Bonjour. Select it, confirm the driver (macOS includes native Brother drivers via AirPrint), and add.
For full feature support beyond AirPrint, download the macOS Full Driver Package from Brother's downloads page first.
Mobile (iOS / Android)
Both platforms support printing to the HL-L2460DW out of the box via AirPrint (iOS) and Mopria (Android) once the printer is on your WiFi. You can also download the Brother iPrint&Scan app for additional control over print settings, scan preview, and toner levels.
7. Troubleshooting WiFi Connection Problems
The WiFi LED tells you a lot: solid on = connected, blinking = not connected or connecting, off = WiFi disabled. Most issues fall into a handful of fixable categories:
LCD shows "Connection Failed"
Likely cause: Wrong password, TKIP encryption, or wrong network selected.
Fix: Reset network (Menu → Network → Network Reset), then retry with the correct SSID and AES encryption confirmed on the router.
LCD shows "Wrong Network Key"
Likely cause: Password entered incorrectly.
Fix: Re-enter carefully — WiFi passwords are case-sensitive. Use the USB installer method to type on a keyboard instead.
WiFi LED blinking constantly
Likely cause: Router changed password or network settings.
Fix: Reset network settings on the printer and re-run setup with updated credentials.
Printer connects but drops WiFi frequently
Likely cause: Weak signal, router channel congestion, or IP address conflict.
Fix: Assign a static IP via the router's DHCP reservation feature using the printer's MAC address (printed on the network config report).
Network SSID doesn't appear in list
Likely cause: Hidden SSID, out of range, or router broadcasting on a non-standard channel.
Fix: Move printer closer to router, enable SSID broadcast, or use [New SSID] to type the network name manually.
IP shows 169.254.x.x (APIPA)
Likely cause: Printer connected to WiFi but couldn't get an IP from the router.
Fix: Restart router and printer; check that the router's DHCP server is enabled and has available IPs in its pool.
WPS attempt timed out or failed
Likely cause: Didn't press router WPS within 2 minutes, or WPS is disabled.
Fix: Try again with faster timing, or switch to the control panel setup wizard instead.
Computer can't find printer after setup
Likely cause: Computer and printer on different subnets, or firewall blocking.
Fix: Confirm both are on the same network; temporarily disable firewall to test; add printer by IP address manually.
How to Reset the Brother HL-L2460DW Network Settings
This clears all wireless configuration so you can start fresh. Worth doing if you've tried setup more than twice without success:
Go to Menu → Network → Network Reset → press OK → select Yes → press OK. The printer will reboot. All WiFi settings are now cleared.
WPA2-PSK with TKIP causes a silent failure. Brother's documentation mentions this, but it's buried. The printer only supports WPA2-PSK with AES. If your router's wireless security is set to "WPA/WPA2 Mixed" or explicitly "TKIP," you need to change the router setting to "WPA2-AES only." Log into your router's admin panel (usually 192.168.1.1 or 192.168.0.1) to change this. Newer routers sometimes label it as "WPA2 Personal (AES)."
Printing a Network Configuration Report
When troubleshooting, this report is your best diagnostic tool. It shows the current IP address, subnet mask, gateway, SSID connected to, signal strength, and MAC address.
To print it: with the printer idle, hold the Go button for approximately 10 seconds until the toner LED flashes, then release.
- IP shows 0.0.0.0 → the printer isn't connected to your router at all
- IP shows 169.254.x.x → the printer connected to WiFi but your router's DHCP server didn't assign an IP
Both scenarios have different fixes — use the troubleshooting table above to act on what you find.
How Fast Is Wireless vs USB?
The printer's rated speed is 32 to 36 pages per minute regardless of whether you're connected via WiFi or USB. The reliable indoor wireless range is approximately 50 feet — 5 GHz is slightly shorter range but less congested, while 2.4 GHz penetrates walls better.
The only meaningful performance difference with WiFi: the very first page sent over the network can have a 1–2 second additional latency compared to USB. For multi-page jobs, you won't notice any difference.
Summary: The Reliable Setup Path
For most home users, WPS is the fastest option if your router has a WPS button. If not, the control panel setup wizard works universally and takes about 5 minutes. The USB installer method is worth using if you want the driver and wireless setup done in one go. The most common reason setups fail is TKIP encryption on the router or an incorrectly entered WiFi password — fix either of those and the printer connects without issue.
Related Articles
The following guides cover topics closely related to this setup guide — useful if you run into issues after connecting or want to expand how you use your Brother printer.
Brother WiFi & Wireless Setup
Connect Brother Printer to WiFi – Quick Wireless Setup
https://printertales.com/video/connect-brother-printer-to-wifi-quick-wireless-setup
Brother HL-L2350DW WiFi Setup – Connect to Wireless Network Easily (Step-by-Step)
https://printertales.com/video/brother-hl-l2350dw-wifi-setup
How to Connect Brother HL-L2370DW Printer to WiFi?
https://printertales.com/video/brother-hl-l2370dw-wifi-setup
How to Connect Brother HL-L2380DW Printer to WiFi?
https://printertales.com/video/brother-hl-l2380dw-wifi-setup
Brother HL-L2395DW Printer Wireless Setup
https://printertales.com/video/brother-hl-l2395dw-printer-wireless-setup
Brother Printer Offline & Connection Issues
Brother Printer Not Connecting to Wireless Network – Easy Fix
https://printertales.com/knowledgebase/brother-printer-not-connecting-to-wireless-network
Brother Printer Offline But Connected? Fix on Windows & Mac
https://printertales.com/knowledgebase/brother-printer-offline-but-connected
Fix Brother HL-L2300 Series Offline Issues (All Models)
https://printertales.com/video/fix-brother-hl-l2300-series-offline-issues
Brother MFC-L2700 Series WiFi Connection Problem – How to Fix?
https://printertales.com/video/brother-mfc-l2700-series-wifi-connection-problem-fix
Brother Printer on Mac
How to Connect Brother Printer to Mac
https://printertales.com/video/how-to-connect-brother-printer-to-mac
Toner & Maintenance
How to Replace Toner in Brother HL-L2350DW Printer (Quick & Easy Guide)
https://printertales.com/video/replace-toner-brother-hl-l2350dw-printer
How to Replace Toner in Brother MFC-L2750DW (Complete Beginner Guide)
https://printertales.com/video/replace-toner-brother-mfc-l2750dw-beginner-guide
Brother HL-L2300D Printer Toner Reset
https://printertales.com/knowledgebase/hl-l2300d-printer-toner-reset
Fix Brother HL-B2000 Series Replace/No Toner Issue
https://printertales.com/video/brother-hl-b2000-series-replace-no-toner-fix
Brother Error Fixes
3 Easy Fixes for Brother Printer Error 04
https://printertales.com/knowledgebase/three-easy-methods-to-eliminate-brother-printer-error-04
Brother HL-B2000 Series Not Printing – How to Fix (All Models)
https://printertales.com/video/brother-hl-b2000-not-printing-fix
Brother Printer Not Printing Black Color
https://printertales.com/video/brother-printer-not-printing-black-color
Brother MFC-7860DW Paper Jam – Fixed
https://printertales.com/video/brother-mfc-7860dw-printer-paper-jam-fix
Frequently Asked Questions
Does the Brother HL-L2460DW support 5 GHz WiFi?
Yes. The HL-L2460DW features a dual-band wireless module that supports both 2.4 GHz and 5 GHz networks (802.11a/b/g/n). You can connect to either band during setup. The 5 GHz band offers less interference in congested environments; 2.4 GHz provides better range if the printer is far from the router.
Can I use the printer on WiFi and USB at the same time?
No. The HL-L2460DW can only use one interface at a time. If a USB cable is connected, the printer defaults to USB mode. Unplug the USB cable to switch to wireless mode.
The LCD says "Connected" but my computer still can't print. What's wrong?
The printer is on your WiFi network, but your computer doesn't have the driver installed yet, or is looking on the wrong network. First, confirm the printer's IP address (print a network config report). Then go to Printers & Scanners on Windows/Mac and add the printer using that IP address directly. If the driver isn't installed, download the Full Driver Package from Brother's site.
My WiFi password has special characters — can I enter them on the LCD?
Yes, but it can be tedious. The control panel lets you cycle through all standard ASCII characters including symbols. An easier alternative: use the USB installer method, where you type the password on your keyboard instead. Or temporarily create a simpler guest network password for the initial setup, then change it back.
Does the printer remember the WiFi settings if I unplug it?
Yes. WiFi credentials are stored in non-volatile memory. The printer will automatically reconnect to your network when powered back on, as long as the router password and SSID haven't changed. If you change your WiFi password, you'll need to re-run the setu
Can I print from my phone to the HL-L2460DW over WiFi?
Yes. iOS devices can print directly using AirPrint. Android devices can print using Mopria Print Service (built into most Android 8+ devices). The Brother iPrint&Scan app (free, iOS and Android) gives additional control over settings and shows toner levels.
How do I find the printer's IP address after setup?
Hold the Go button for 10 seconds to print a network configuration report — the IP address is listed on that page. Alternatively, log into your router's admin page and check the connected devices list; the Brother printer will appear by its MAC address or hostname.

