How to Fix Brother Printer In Error State Problem Quickly?
You can face various problems with a printer as a machine it breaks down occasionally. Some issues give a message on the screen without much information. Whenever this happens, you cannot provide print commands to the printer from the computer as it does not print anything. If it keeps you away from printing essential documents, then it is time you must know how to fix the Brother printer in error state problem. To guide you in this, proceed with the following troubleshooting methods.
Solutions to Resolve Why Printer Is In Error State
Below are the solutions to the problem of the printer being in error. They all are easy to follow without getting puzzled. However, you must ensure that you must follow each step.
Method 1: Follow the Basic Troubleshooting Steps
Sometimes, a slight problem with a printer tends to receive an error message. Before moving on to the advanced solution, try some preliminary steps, as mentioned below.
- Ensure the printer cables are properly secured and tight.
- Try rebooting your computer and the printer.
- Check that there is no paper jam in any part of the printer.
- Ensure the printer status is online and is ready to print.
Method 2: Disable “Use Printer Offline” and “Pause Printing” Option
Check that the Brother printer is showing an offline status at the taskbar underneath its icon. It may have happened due to some changes or connection issues. In some cases, the printer gets paused and faces a problem. You must change the status to online and resume it using the below instructions.
- Move to the search bar, type Run, and choose the relevant app.
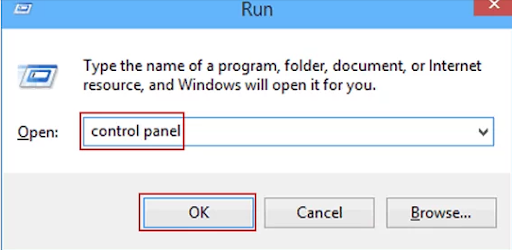
- When the Run box opens, type the control panel and click on the OK.
- It will open the control panel window to choose “Devices and Printers.”
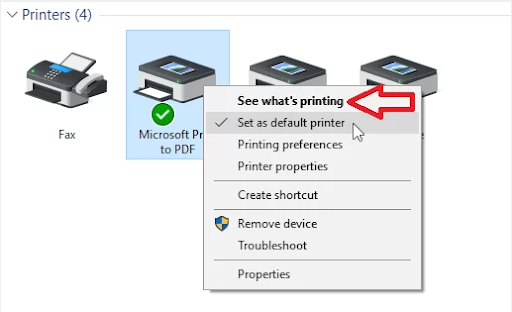
- Find your printer, right-click it, and select “See what’s printing.”
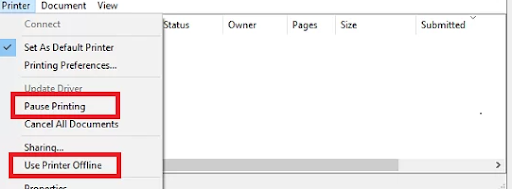
- In the new window, hit the Printer tab, and a drop-down list will appear.
- After that, uncheck “Use Printer Offline” and the “Pause Printing” option.
- Lastly, reboot the computer and the printer and check if the error is gone.
Method 3: Ensure Print Spooler Start Type Is Automatic
The Print Spooler is a feature to manage the printing tasks from system to printer. It even holds the complete list of print jobs done. Therefore, if it is not working correctly, you must fix it. You can ensure its setting is correct using the below steps and resolve the printer problem.
- Enter the “services.msc” command on the Run box and hit OK.
- In the new window, point to Print Spooler and right-click on it.
- Click on Restart or the Start option if the spooler is stopped.
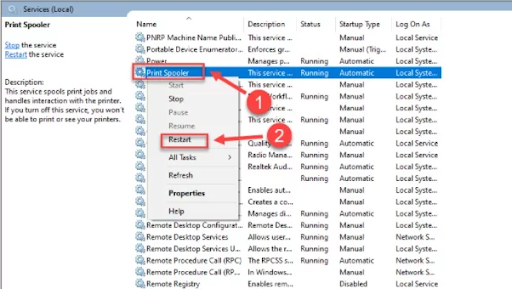
- Again, right-click the Spooler option and select Properties.
- Ensure the spooler Startup Type is Automatic; if not, set it from the list.
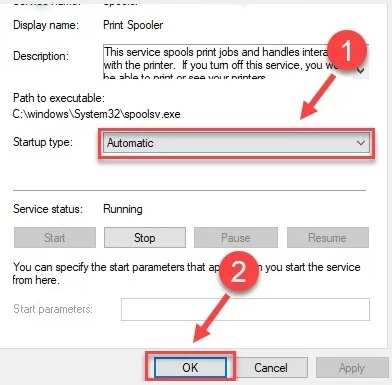
- After setting to Automatic, hit OK and click on Apply button.
- Check the problem has been fixed and that the printer is usually working.
Method 4: Delete All Spooler Files And Restart It
The Print Spooler store all the print files on the system. Because of this, the spooler may face problems. You must clear these files and perform the reboot process of the device following the below-given instructions.
- Firstly, stop the spooler service from running on the system.
- Then, on the Run box, type C:\Windows\System32\Spool\Printers.
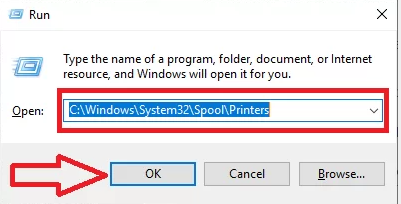
- Click the OK button, and it will navigate to the Printers folder.
- Select all the files in the Printers folder at once and delete them.
- Click Yes on the confirmation window that pop-up on the screen.
- Again, restart the Spooler service by right-clicking on it.
- Finally, reboot the computer and the printer to apply changes.
Method 5: Enable the Legacy PnP Detection Feature
Legacy PnP is a Windows feature to enable the system to adjust to hardware changes. Users can attach and detach devices without manual configuration or computer knowledge. Enable this to resolve the printer problems using the mentioned steps.
- Find the Device Manager from the search bar and open its window.
- From the View tab, choose the option “Show hidden devices.”
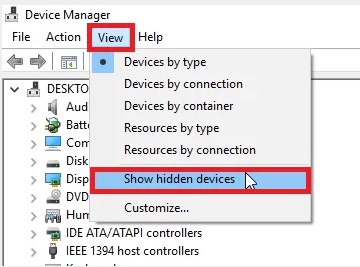
- Hit on “Ports (COM & LPT)” and right-click on ECP Printer Port (LPT1).
- Select Properties and then click on the Port Settings option.
- Afterward, select the “Use any interrupt assigned to the port” option.
- Checkmark the option “Enable legacy plug-and-play detection.”
- Click OK and then restart the printer to apply the changes.
Read Also:- How to Fix Brother Printer Is Not Responding (Quick Fixes)
Method 6: Update the Out-of-Date Printer Driver
Updating the printer driver helped fix several bugs and keep it running correctly. It is always suggested to have the latest driver on the system. Use the below helpful instructions to update it.
- On the Run dialog box, type the command “devmgmt.msc” for the Device Manager.
- On the management tool, click View and choose “Show hidden devices.”
- Click Print Queue, right-click on your printer, and select “Update Driver.”
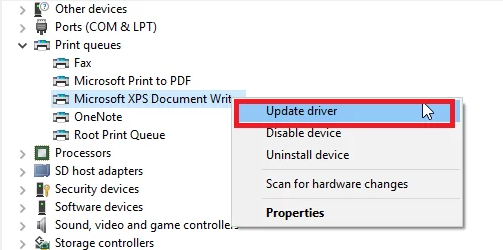
- Now, choose the first option, “search automatically,” to update the printer driver.
- After completing the update process, restart the system and check if the issue is resolved.
Conclusion
All the methods, as mentioned earlier, help resolve the Brother printer in error state problem. These are the best solutions to clear the error from the screen and make the printer function again.
Frequently Asked Questions
Why does the Brother printer receive an error state message?
When the printer receives such a message, there might be technical glitches. This issue often occurs due to wrong system permission settings, corrupted driver, faulty connection, spooler error, etc.
How can you fix the Brother printer error state problem?
This problem arises for several reasons, some of which are mentioned here. You can set the correct printer spooler settings, update the drivers, delete the spooler files, disable the offline option, etc.
Can a faulty driver create the printer an error problem?
Yes, it may cause a printer issue. You must update it to remove the error message and fix the problem. You can use automatic or manual ways to perform the update process.

