Epson L3110 Black Ink Not Printing [Fixed]
![Epson L3110 Black Ink Not Printing [Fixed]](https://printertales.com/public/upload/blog/6990393bb5093_epson-l3110-black-ink-not-printing-fixed-.webp)
It’s frustrating when your Epson L3110 printer does not print black ink and produces uneven results, such as missing lines or faded text. This may happen if you have not used your printer for a while, if you are using third-party ink, or if a power cut occurred while you were using your printer.
As a result, the nozzles may be clogged because the printer was not used for a long time. You may have tried different solutions, but nothing worked. Don’t worry, as we have explained, simple steps to fix the Epson L3110 black ink not printing issue. But before we start discussing the troubleshooting process, we want you to understand the main cause of the problem.
Root Causes for Black Ink Not Printing on Your Epson Printer
- Clogged printhead due to dried ink
- Air trapped in the ink tubes
- Failed capping mechanism
- The black ink tank is low or empty
- Outdated or corrupted drivers
What to Check Before Fixing Black Ink Not Printing Issue?
To have everything going smoothly, here are the important things to check in the first place when fixing the black ink not printing issue:
- Check if the printer is connected properly to your PC: If using a USB cable, confirm it is securely plugged in at both ends.
- Inspect the ink tank properly: Check if the ink tank is properly filled and sealed. Confirm that it is low or empty. Make sure the ink tank caps are tightly closed and there are no leaks.
- Look for error lights: Check your printer screen for any error or blinking lights. Check the user manual to understand what the light patterns mean.
- Do a nozzle check: Go to the printer’s maintenance settings, and run a nozzle check to see if the black ink lines appear faded or broken.
- Check printer settings: Use the correct printer settings. Make sure the printer is not set to “Color Only” mode. Select Grayscale or Black/Grayscale if printing black text. See if the correct paper type is selected.
Steps to Fix the Epson L3110 Black Ink Not Printing Issue
Take a look at the steps below to learn how to troubleshoot the Epson L3110 black ink not printing issue with ease:
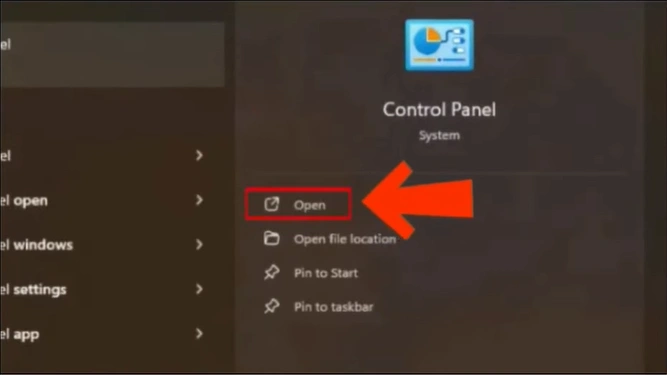
Step 1: Press the Windows Start button on your keyboard.
Step 2: In the search bar, type “Control Panel.”
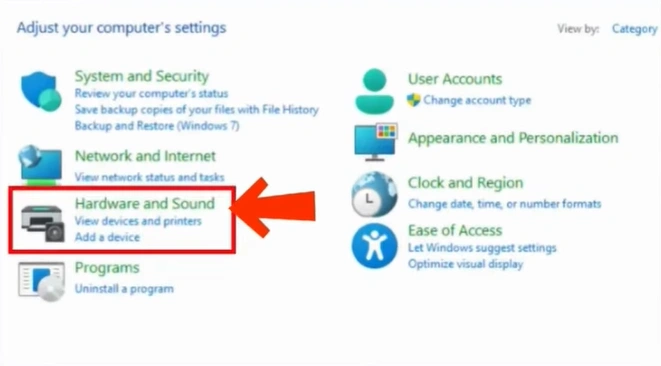
Step 3: Next, click “Hardware and Sound.”
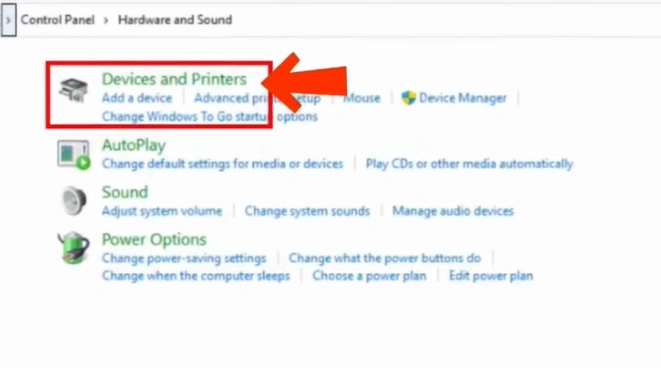
Step 4: Select “Devices and Printers.”
Step 5: Click on “Devices” from the list.
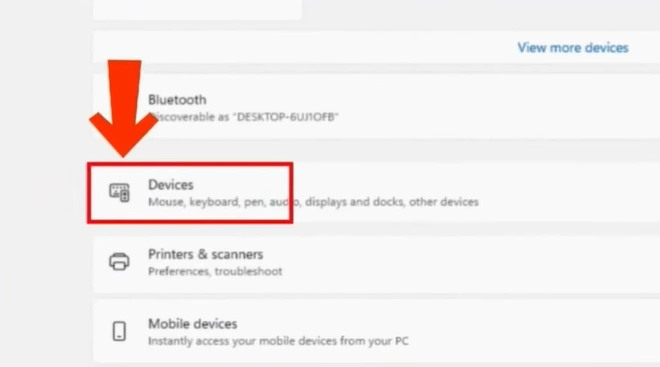
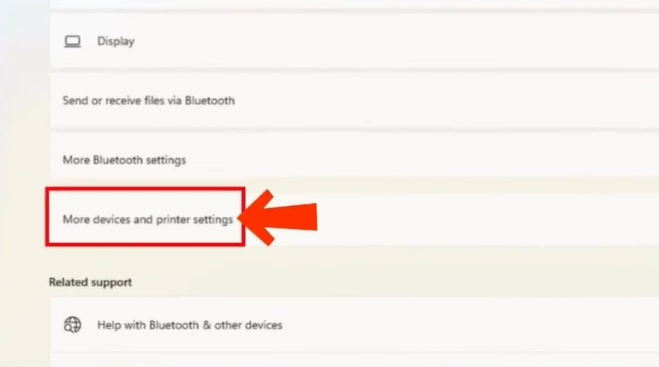
Step 6: Scroll down to More devices and printer settings, then click it.
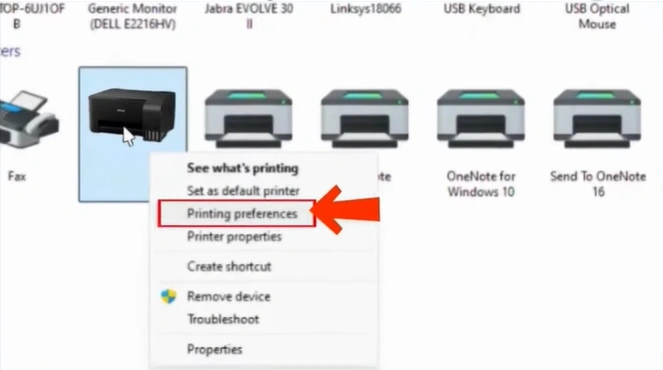
Step 7: Locate your printer model (e.g., Epson EcoTank L3110), then right-click it.
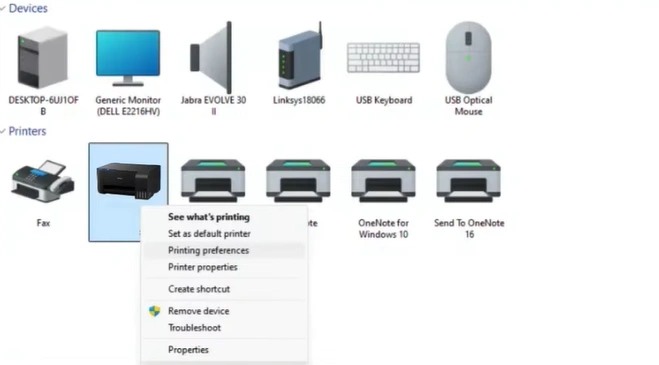
Step 8: From the dialog box, choose “Printer preferences.”
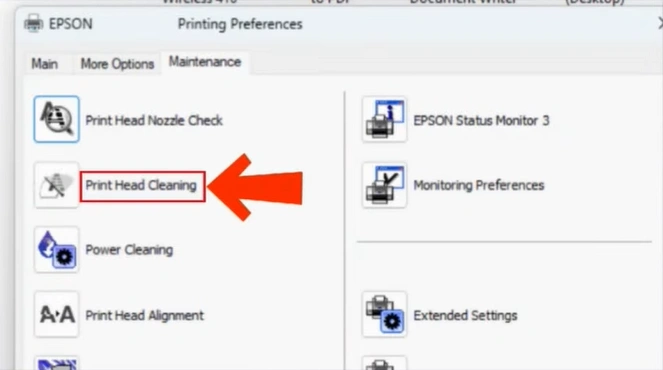
Step 9: Now, on the Printer preferences pop-up window, go to the Maintenance tab.
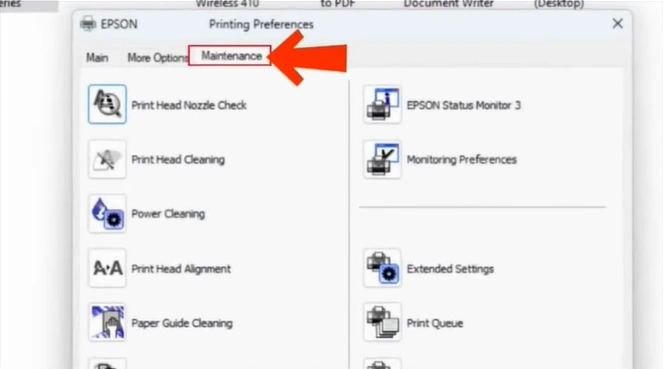
Step 10: Select “Print Head Cleaning” to start the cleaning process.
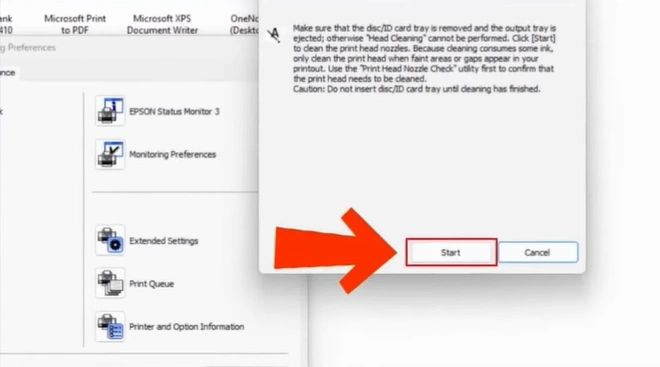
Note: Make sure your printer is powered on.
Step 11: Press the “Start” button and wait for your printer to finish the first cleaning cycle.
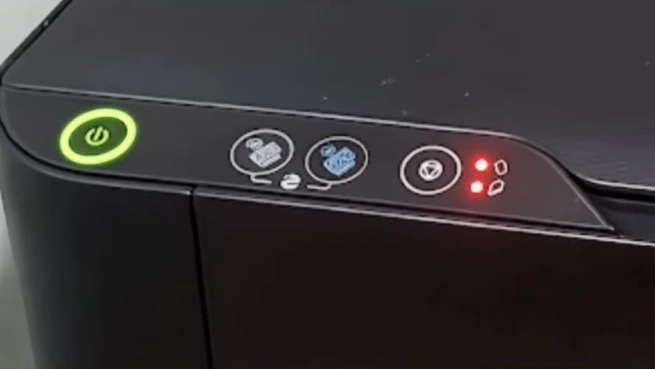
Step 12: The power button on your printer will start flashing. This indicates that the printer is cleaning its head.
Step 13: Once the cleaning cycle is finished, press the “Print Nozzle Check Pattern” button.
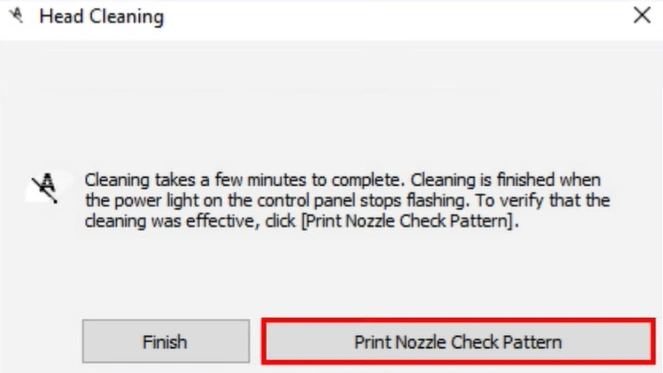
Step 14: Now, in the new window, choose the “Print” option.
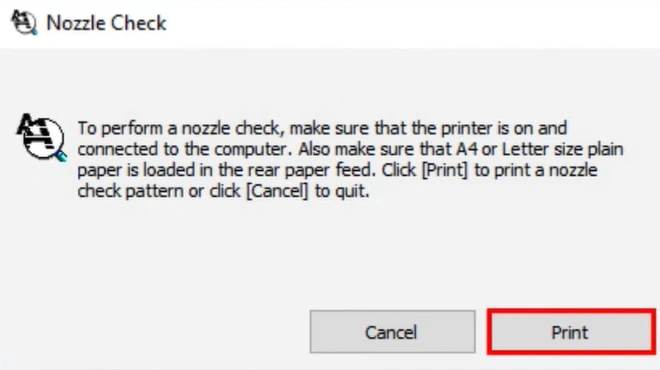
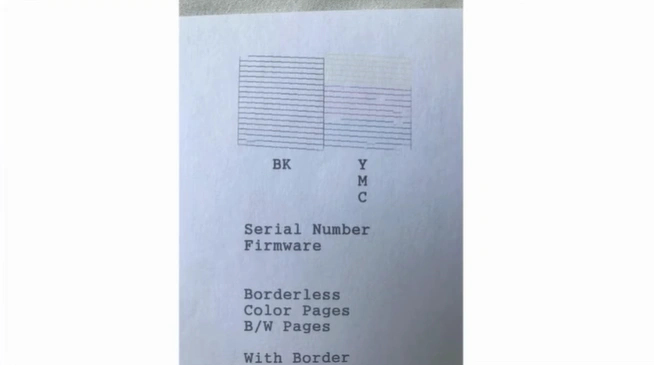
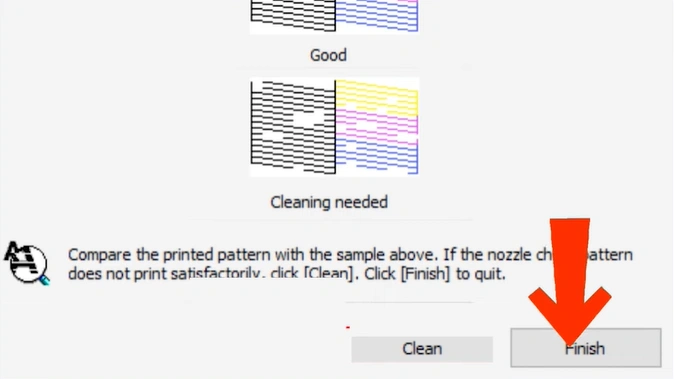
Step 15: The printer will print a nozzle check. Compare it with the sample shown on the screen. If you find any gaps or faint lines, click on “Clean.”
Step 16: Click on the “Finish” option if the printout looks satisfactory.
Winding Up
This is how you can fix the Epson L3110 black ink not printing issue. Just follow what we have discussed, and you can carry on with your print tasks without problems. Apply each step carefully and do not miss anything. Check the connection, inspect the ink cartridge, and run a nozzle check before you start the troubleshooting.
Frequently Asked Questions
What should I do to avoid black ink not printing in the future?
Keep in mind these preventive measures to avoid the black ink not printing issue again:
- Always use original Epson ink bottles, as they are less likely to cause clogging. Also, they help maintain good printhead health.
- Use the printer regularly to prevent the nozzles from drying out; that’s a very common cause of missing ink in the printouts.
- Check ink levels and replace the old cartridges before they are fully empty. This way, you can restrict the formation of air bubbles.
- Turn off the printer using the power button, and not by removing the cable. By doing so, your printer can properly cap the cartridges and prevent ink drying.
How to check ink levels in my Epson L3110 printer?
Make sure your printer is connected to your PC.
Press the Windows Start button.
Search for and open the Control Panel on your computer.
Click on Devices and Printers.
Right-click on “Epson L3110” and select “Printing Preferences.”
Go to the Maintenance tab.
Click on “Epson Status Monitor 3.”
A window will appear showing the current ink levels for each color (cyan, black, magenta, and yellow).
How to download & install Epson printer drivers?
Open your web browser.
Visit the official Epson site.
Search for your printer model number.
Choose your operating system (Windows/macOS).
Download the latest Drivers and Utilities Combo Package for your printer model.
Open the downloaded file from the Downloads folder.
Follow the on-screen prompts for installation.
Agree to the terms and click on the Install button.
Choose the connection method you prefer (USB or Wireless/Wi-Fi).
How often should I use Epson printer to prevent clogging?
To prevent clogging, use your printer at least once a week, or every 2–3 days. Print a small, full-color page to prevent the nozzles from drying out.
When should I use power cleaning to fix “black ink not printing” issue?
These are a few situations where you must do power cleaning of the printhead to fix the black ink not printing issue:
When the black color is still missing from your print results even after 2–3 regular cleaning cycles.
When the printer has been idle for a long time, the ink may have dried inside the nozzles.
When printouts show faded prints or completely blank pages.

