5 Common Epson Printer Errors and Fixes | Printer Tales
There are plenty of Epson printer errors that won’t let you complete the print jobs. People who use the print system on a regular basis must know some of the common errors and their solutions. In this article, we have gathered the list of issues that often occur in your device. However, not everyone has an idea to fix it promptly. So, we have listed the troubleshooting steps for each error.
What are the Common Issues of the Epson Printer?
Here are some of the error examples that frequently interrupt your print jobs.
- Printer in Error State
- Unable to Print or Not Printing
- Paper Jam
- Paper Feed Jam
- Failed Network Connection
- Cartridge Not Recognized
- EcoTank Prints Stripes, Incorrect Colors, or No Colors
- Roll Paper is Unable to be Cut
When it comes to errors, they are not limited. It can trouble any part of the print system and occur anytime. If the error you need a solution for is not listed here, Book A Service to get the help you require.
Epson Printer in Error State Issue
When the Error State displays on the Control Panel, it means there could be an issue with the printer itself. Now, there are various reasons for this message to occur.
Why Does an “Error State” Message Occur?
Here is the list of reasons that can create this issue to happen:
- Outdated/ Faulty driver
- When the Printer is Not Set as Default
- Offline status in the Printer
- Incorrect Network Connection
- Spooler Service Error
- Paper Jam
Look for these issues in your print system and follow the troubleshooting methods.
Solution 1: Disable the Offline Feature
To remove this message from the Control panel, check the status of the printer.
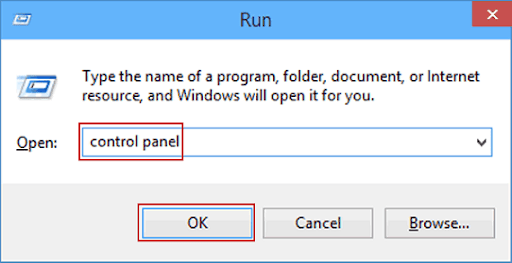
- Start by opening the Run Dialog box.
- Then, enter “control panel” in the box and press Enter.
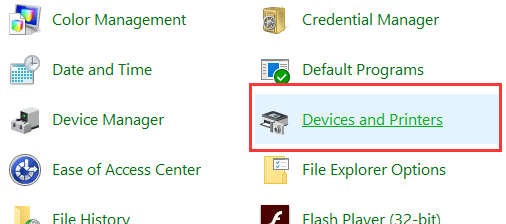
- In the next step, tap the “Device and Printers” option.
- Now, the printer list will appear.
- After that, right-click on the “See what’s printing” option.
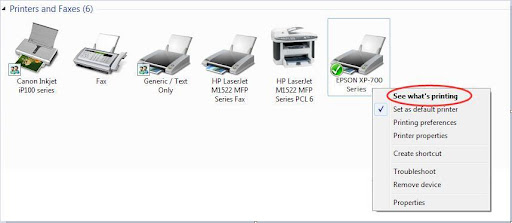
- Next, press “Printer” and check if the “Use Printer Offline” option is enabled.
- Here, you need to uncheck the box to disable it.
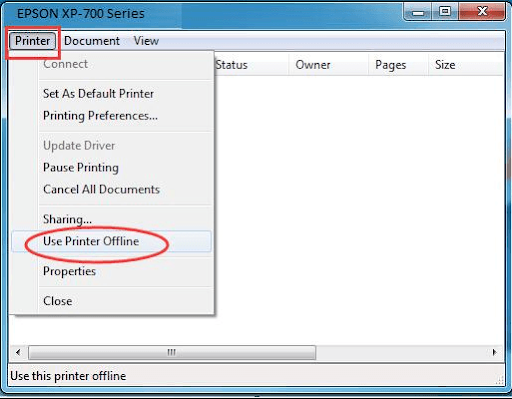
- In the end, you can exit the window and start printing.
Solution 2: Check the Print Spooler Service
You need to check the print spooler service to see if the print jobs are creating a problem.
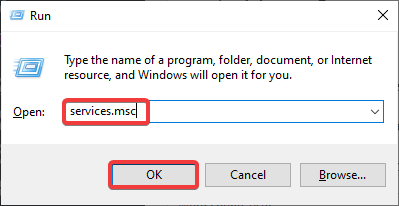
- First, open the run command box.
- Now, type “service.msc” in the blank space.
- Then, you have to hit the OK option.
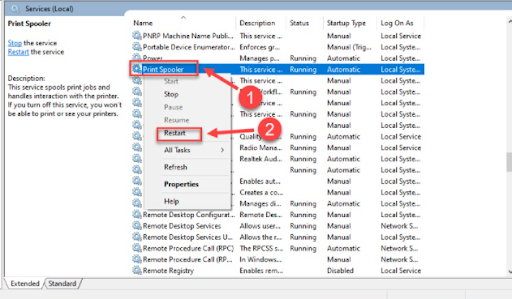
- Go to the Service window and click on Print Spooler.
- Thereafter, you have to right-click on the program.
- If you see the service has paused, tap the Start button,
- You can also choose to restart the service.
- In the next step, verify the startup type and ensure it is set to automatic.
- To enable the Automatic feature, follow the next step.
- Right-click on the Print Spooler and choose the properties.
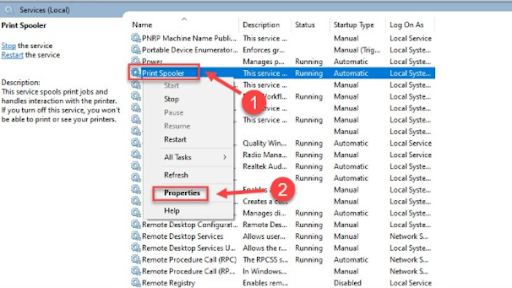
- Go to the drop-down menu and click on the Service button.
- In the next step, click the OK button.
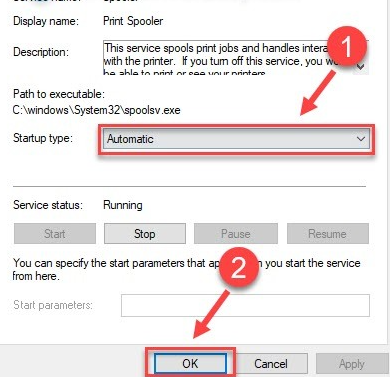
- Now, navigate to the general tab and choose the startup type as “Automatic.”
- Check if the error code still occurs.
If errors are still occurring, it requires maintenance and servicing. For easy and quick assistance, Book A Service and let the professional handle the rest.
Printer Not Printing Issue
There will be many times when the printer won’t print or respond to the print jobs. In these cases, you can try the following methods. Before that, you must know the causes.
Why Does Printer Not Printing Issue Occur?
There could be many reasons, such as empty ink cartridges, connection failure, stuck print jobs, damaged cables or power cords, or a Print Spooler Service error. If you find the ink level low or empty, replace the cartridge with a new and genuine one. And if you are met with Spooler Error or Connection Failure, do the following.
Solution 1: Clear Print Jobs
- Hit the Windows logo and R key to launch the Run box.
- Provide the "services.msc" command and press Enter.
- The Services window will open.
- Double tap on Print Spooler and click Stop.
- Then, you have to tap on OK.
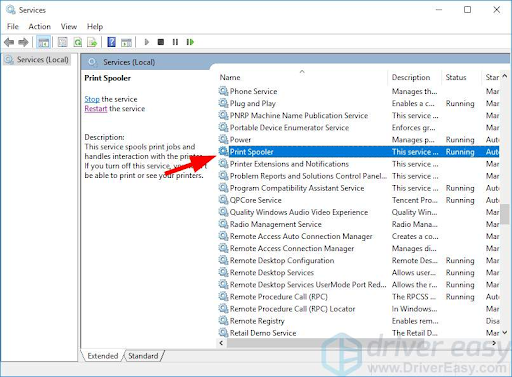
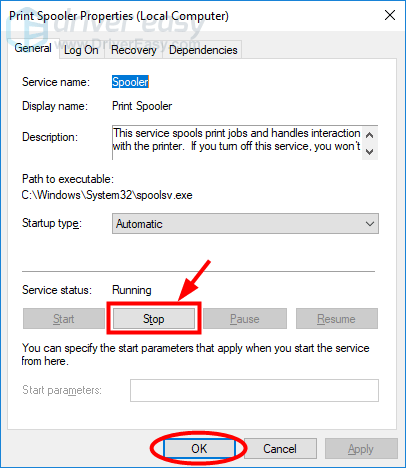
- In the next step, exit the Services window.
- After that, press the Windows logo key and E to open File Explorer.
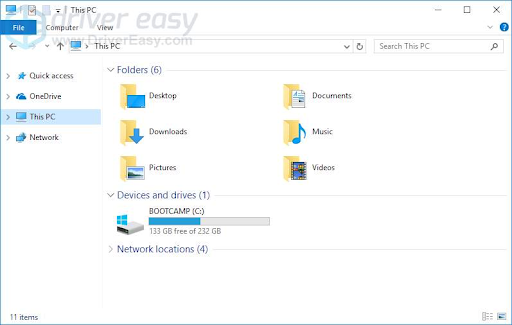
- Enter the following address and click Enter to open print jobs.
a. %windir%\System32\spool\PRINTERS - Clear all the files from this folder and go to the Services window.
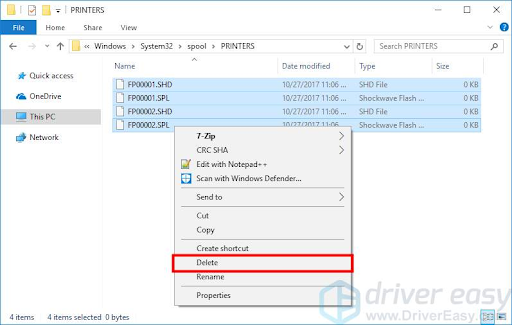
- Next, double-tap on the Print Spooler service.
- Now, tap the Start option to initiate the service.
- Click OK in the menu to save the changes. And close the window.
- Close all windows and switch off your PC.
- Unplug the power cord from your printer and turn it off.
- Leave the print system for 5 to 7 minutes.
- Connect the power cable and turn it on.
- Restart your PC and see if the print error occurs again.
Solution 2: Check the Printer Connection
It can occur if your printer and PC are not properly connected. Here, you need to verify the connection.
If your printer is connected to the PC through a USB cable:
- Verify that the cable is correctly plugged in.
- If it isn't, reconnect the cord, check both ports, and ensure they are properly seated.
- Without using a hub, connect your printer directly to your PC.
- To check if it works for you, try connecting the cord to a different USB port.
- You might also want to try a different cable to check for the issues in the one you're currently using.
If You are Using a Network Printer:
- Verify the router and modem, including the network connection.
- Check the network connection status to see if it is connected correctly.
- If you are using a wired connection, reconnect it or change the cord as needed.
- Now, reconnect it to your home or office network to get started.
If you use Bluetooth to connect your printer:
- Make sure your computer and printer are kept close.
- See if reconnecting the printer fixes the error.
Make sure to pause the print jobs when performing these troubleshooting methods.
Printer Not Connecting to Network
You are trying to print a document or image from your device, and the printer is unable to establish a network. It usually happens due to the interrupted Wi-Fi connection. Here is how to fix it.
- Verify the Wi-Fi signal to check if it is strong and consistent.
- Then, you need to reset the modem.
- Uninstall any software from your PC and restart it.
- Then, install the driver & software package.
- Delete the network setting from your print system.
- Check the manual to reset the network if you don’t know.
- If the error is still stuck, use a USB cable to connect the printer and the PC.
- During the connection setup, tap on “Automatic setup with USB cable.”
- Your PC will now copy the Wi-Fi configuration settings to the print system.
Your network failure will be resolved by now. If it still continues, Book A Service and get the professionals to help you.
Epson Printer Paper Jam
The message clearly states what the problem is. It means your print jobs are interrupted due to the stuck paper inside the machine or other parts.
It could be due to the stuck paper at the wrong angle, which caused it to tear. Maybe you inserted the wrong paper type, which makes it difficult to print. Here is what you should do next.
- Power off your print system and remove the connector.
- Open the front paper tray and take out all the paper scraps inside.
- It will make it easier to remove the jammed sheet.
- Now, use both hands and slowly pull out the paper.
- Check for the hatch on the back of your printer.
- If there is one, open it and take out the stuck sheet.
- If possible, try to remove the sheet with your hands so it won’t tear.
- Now, remove the cartridges (toner or ink) to check for stuck paper or other materials.
- Take more space and remove the jammed paper inside the machine.
- In the end, reconnect the printer and feed the paper tray.
- See if the paper jam still occurs in the display.
If there is no paper jam and the display still shows this message, you need to service the print system.
Printer Doesn’t Recognize the Cartridge
When your printer refuses to recognize the cartridge, then it means the issue lies within itself.
If the ink or toner cartridges are full and printing still won’t start, you need to check if it is compatible.
- First, open the machine and take out all the protective material.
- Then, take a dry and dust-free cloth to clean the Green Chip.
- Also, check the contact point to see if they are covered in dirt or debris.
- Then, clean the contacts with a dry and clean cloth.
Read More:- Why Is Epson ET-7750 Not Printing, And How to Fix It?
- After that, check the positions of the cartridges.
- Now, see if they are placed correctly in the slot.
- Check for holes on the bottom or in the plastic.
- If it is not the problem, set the cartridges back into the slots.
- Push it until you hear a click and the cartridges are aligned.
For other Epson Printer Errors and Solutions, connect with Printer Tales. You can Book A Service and skilled professional to fix your printer-related issues within minutes. All of these methods are reliable and effective. If you are unable to fix the issues with these methods, contact us at +1-877-469-0297 or +44-800-054-8150. You can also send us your queries at info@printertales.com.
Frequently Asked Questions
How do I find the Epson ink reset button?
You can use the Reset button for refilling purposes, as some Epson models have the feature. If you need to locate it, turn the ink cartridge from where you can see the microchip. Check for the metal contacts and locate the Reset button. Press the Reset button and fix the errors.
Why is my Epson printer not printing when the ink tank is full?
Even if the cartridges are ready to print, your print jobs can be stuck. It can happen when the cartridges are not in contact with the printer. The quickest way to fix this problem is to uninstall and install the cartridges. Also, check if they are compatible with your print system.
Why is the orange LED blinking on my Epson printer?
It means that the ink level in the cartridge is low. You can open the printer and check which cartridge is low. If it is, you can replace it with a genuine one. It could also mean that the cartridges are not installed correctly. To fix it, take the cartridges out and install them again.

