How to Replace Toner in a Brother Printer: The Complete Guide
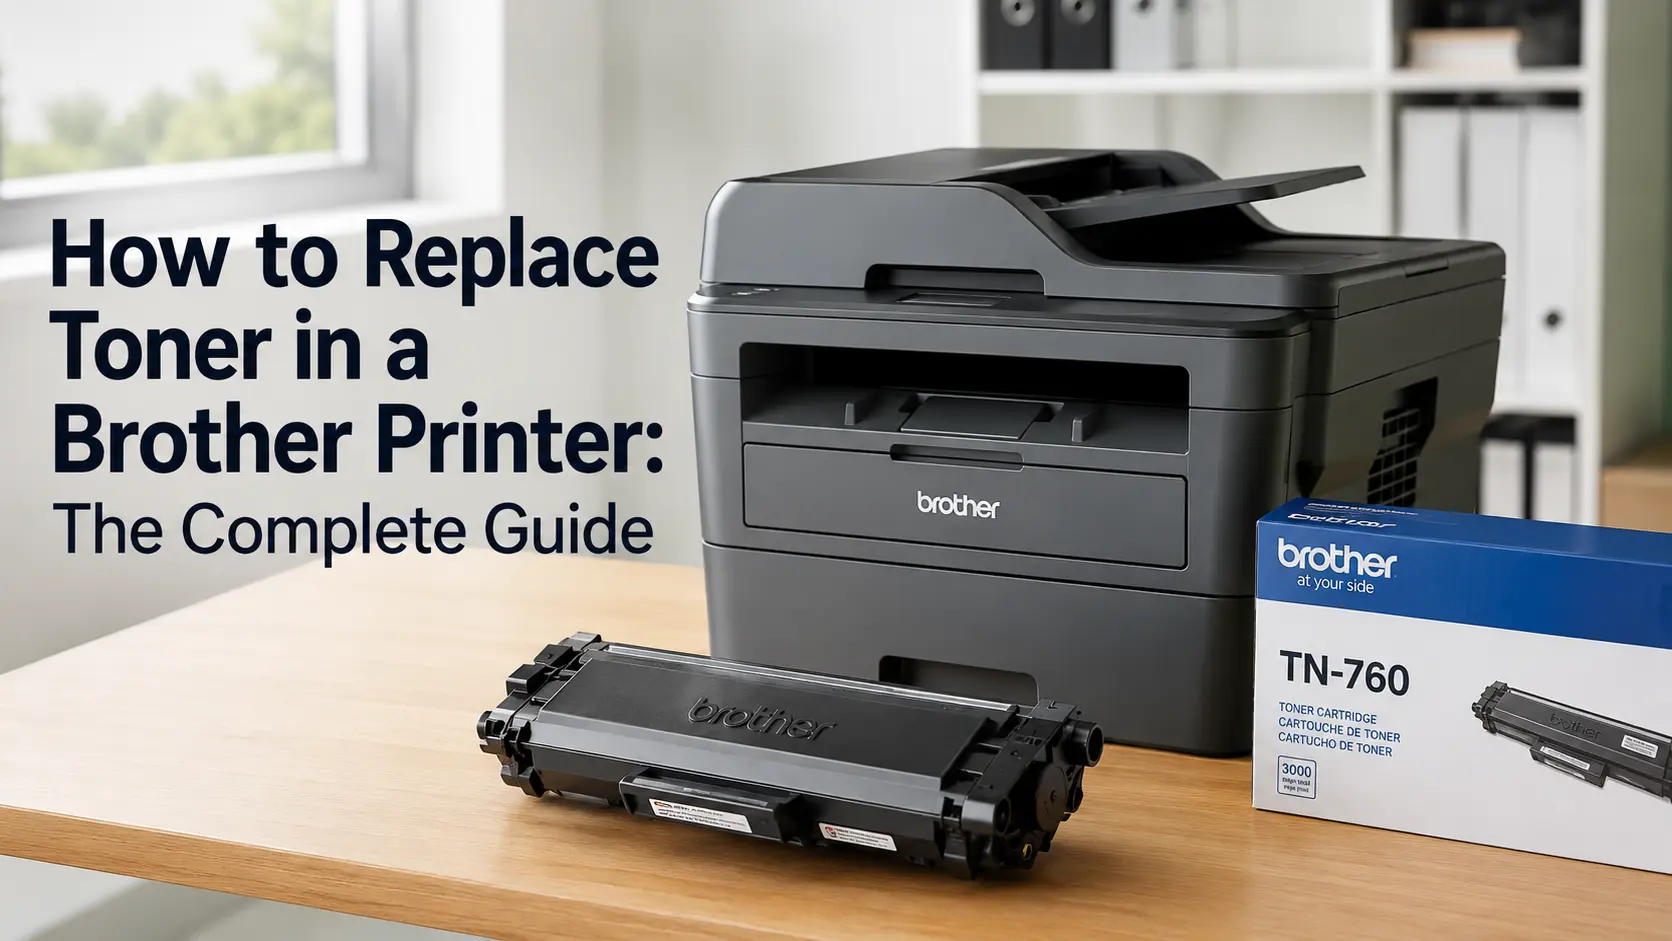
Replacing toner in a Brother printer takes about five minutes and needs no tools: open the front cover, pull out the toner-and-drum assembly as one piece, separate the empty toner cartridge from the drum unit by releasing the coloured lock lever, click the new cartridge into the same drum, and slide the whole assembly back in.
That's the process in a nutshell but two details trip up almost everyone the first time. First, on Brother machines, the toner cartridge and the drum unit are two separate parts that come out of the printer connected together. You're not replacing "a cartridge" the way you might on an HP or Canon machine; you're replacing the toner half while reusing the drum half. Second, the drum unit has a cleaning tab that needs resetting to its home position, or you'll get a faint vertical stripe down every page you print afterwards. Both of those get covered properly below.
Why Brother's Two-Part System Works Differently
Most HP and Canon home/small-office laser printers combine the toner and the drum into a single sealed cartridge. When the toner runs out, you throw the whole thing away, imaging drum included, and buy a new one.
Brother does it differently on virtually its entire HL, DCP, and MFC laser lineup: the toner cartridge (a TN-series part number, like TN660 or TN760) and the drum unit (a DR-series part, like DR630 or DR730) are sold and replaced separately.
| Feature | Toner Cartridge (TN-Series) | Drum Unit (DR-Series) |
|---|---|---|
| What it does | Holds the black/colour powder | Transfers the powder onto the paper |
| Lifespan | ~1,200 to 20,000 pages | ~12,000 to 50,000 pages |
| Replacement frequency | Every time powder runs out | Roughly once every 3–4 toner swaps |
This matters for your wallet more than most articles let on. Because the drum outlasts three or four toner cartridges, you're paying for a full imaging drum roughly once for every three or four times you pay for toner. On a combined-cartridge printer, you're effectively paying for a new drum every single time, whether it needed replacing or not. It's a genuinely more economical design over the life of the printer, which is part of why Brother's running costs per page tend to undercut comparable HP models.
What You'll Need
- The correct replacement toner cartridge for your exact model (check the label inside the front cover, not just the printer model number several Brother models share a body but take different TN numbers depending on region)
- A flat, non-reflective surface to work on
- About five minutes
You don't need gloves, though toner powder will mark light-coloured clothing if a bag is ever punctured - it doesn't wash out like ink does, since it's a plastic-based powder rather than a liquid dye.
Step-by-Step: Replacing the Toner Cartridge
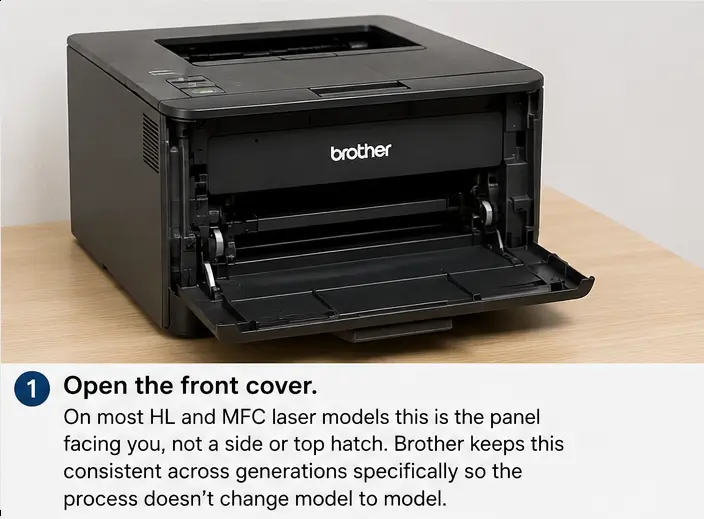
1. Open the front cover. On most HL and MFC laser models this is the panel facing you, not a side or top hatch. Brother keeps this consistent across generations specifically so the process doesn't change model to model.
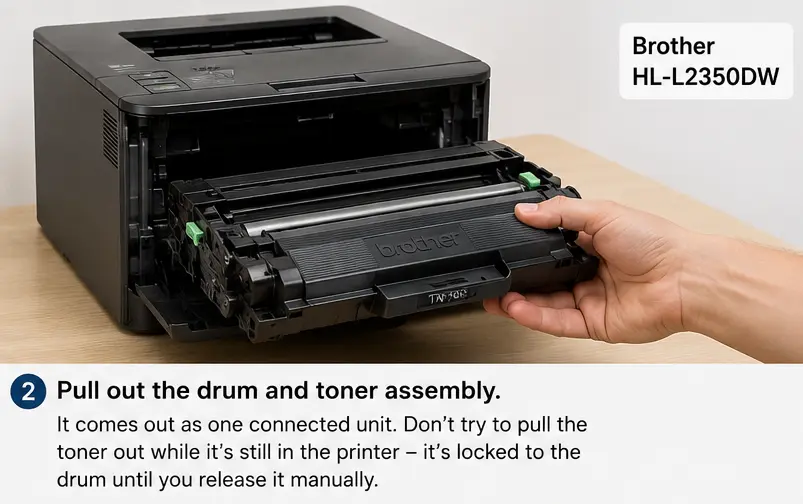
2. Pull out the drum and toner assembly. It comes out as one connected unit. Don't try to pull the toner out while it's still in the printer - it's locked to the drum until you release it manually.
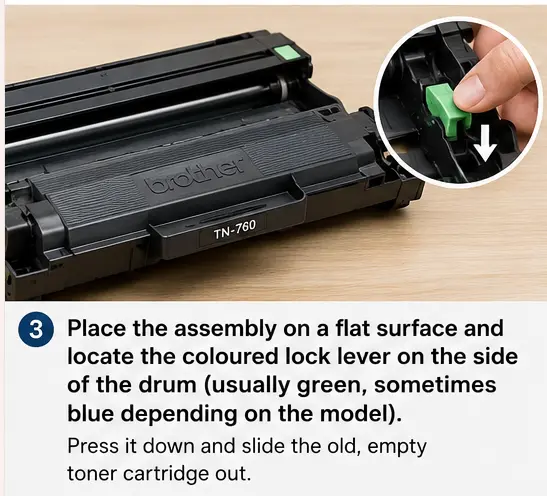
3. Place the assembly on a flat surface and locate the coloured lock lever on the side of the drum (usually green, sometimes blue depending on the model). Press it down and slide the old, empty toner cartridge out.
4. Set the drum unit down carefully, away from light.
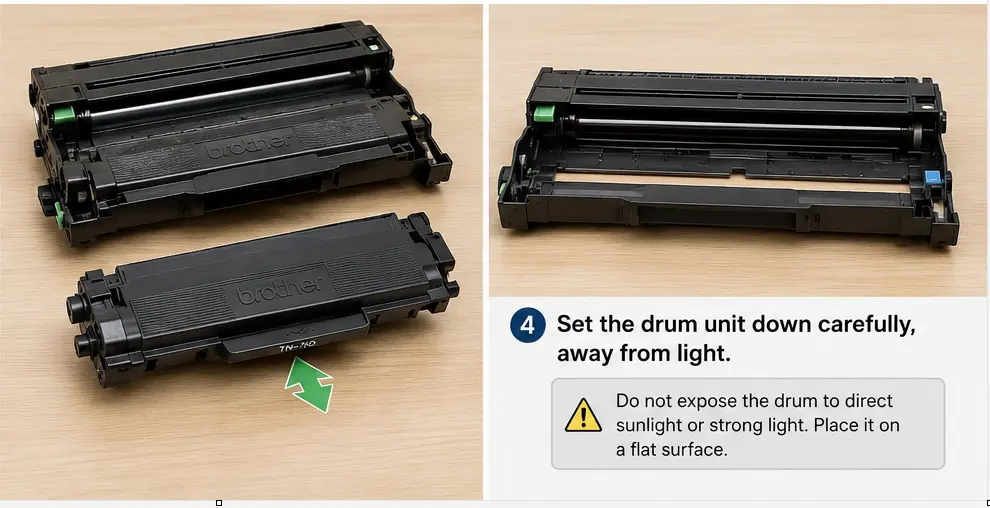
Crucial warning: The cylinder on the drum unit is genuinely light-sensitive, not just marketing caution. Don't leave it exposed to direct sunlight or a bright desk lamp for more than a couple of minutes - doing so can visibly degrade print quality on the next few hundred pages.
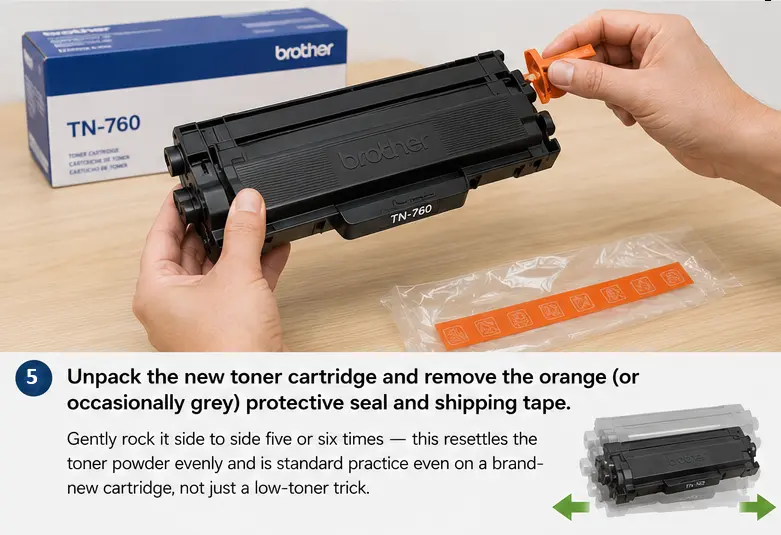
5. Unpack the new toner cartridge and remove the orange (or occasionally grey) protective seal and shipping tape. Gently rock it side to side five or six times - this resettles the toner powder evenly and is standard practice even on a brand-new cartridge, not just a low-toner trick.
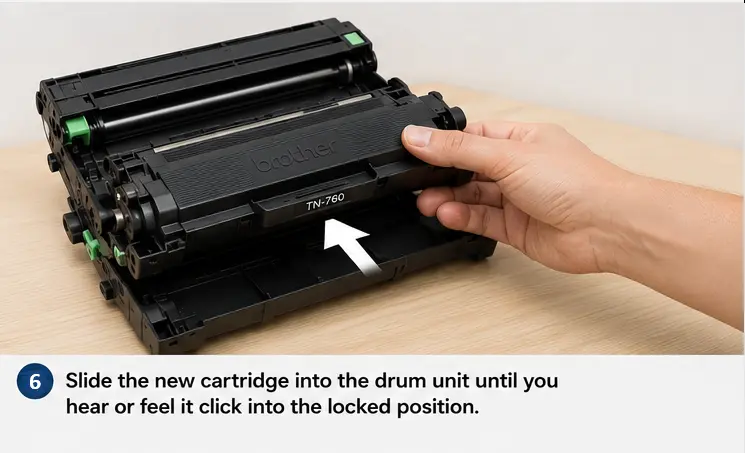
6. Slide the new cartridge into the drum unit until you hear or feel it click into the locked position.
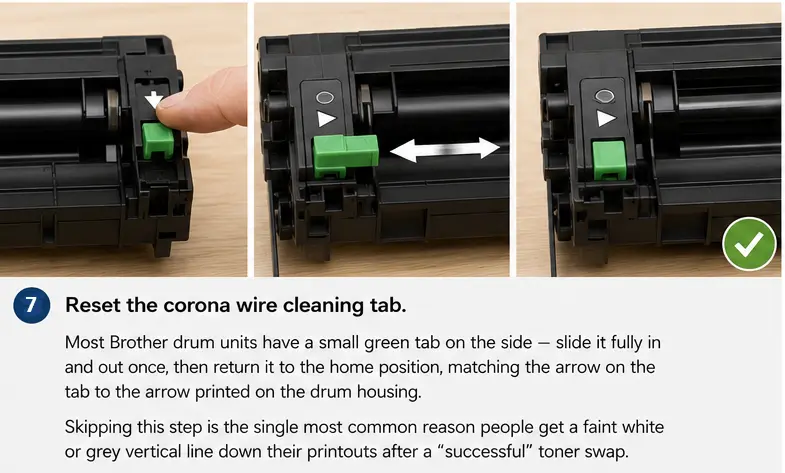
7. Reset the corona wire cleaning tab. Most Brother drum units have a small green tab on the side - slide it fully in and out once, then return it to the home position, matching the arrow on the tab to the arrow printed on the drum housing. Skipping this step is the single most common reason people get a faint white or grey vertical line down their printouts after a "successful" toner swap.
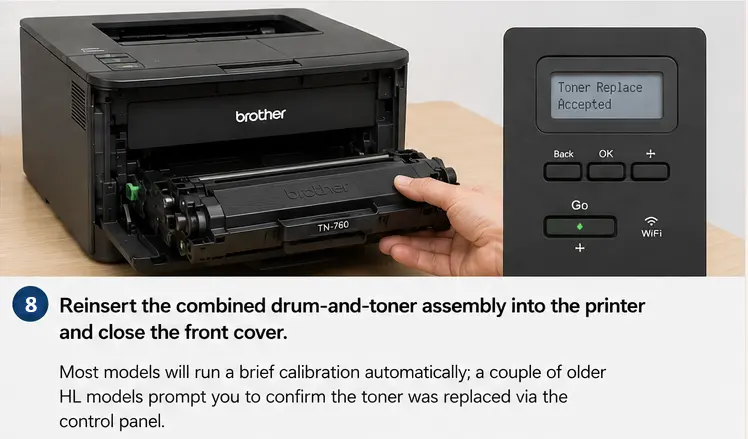
8. Reinsert the combined drum-and-toner assembly into the printer and close the front cover. Most models will run a brief calibration automatically; a couple of older HL models prompt you to confirm the toner was replaced via the control panel.
Don't bin the empty cartridge. Brother runs a free mail-in recycling programme. Log in to (or create) a Brother account, print a prepaid USPS shipping label from their recycling page, box the empty cartridge, and drop it at any post office. If that's not convenient, Staples and Office Depot both take Brother toner at their in-store recycling kiosks.
After You Replace It: What to Actually Check
Print a test page before you consider the job done. Most Brother printers have a built-in test print function accessible from the menu, which is more useful than just printing a random document because it shows a full-page pattern that reveals streaking or fading immediately rather than three lines into a letter.
If you're using a compatible (non-Brother) cartridge rather than genuine, check whether your specific model needs a manual toner counter reset. Some Brother units read a chip on the cartridge automatically; others — particularly older HL and MFC models need you to hold specific button combinations, or the printer will keep reporting "toner low" even with a full cartridge installed.
When "Toner Low" Doesn't Mean What You Think
Here's something most guides skip: the "toner low" warning on a Brother printer is deliberately conservative. It typically appears with somewhere around 5-10% of usable toner still left in the cartridge. Brother would rather warn you early than have you run out mid-document. In practice, once that light comes on, you can usually squeeze out another 50 to 150 pages depending on how graphics-heavy your printing is, and gently rocking the cartridge side to side (same motion as step 5 above) can extend that further by redistributing toner that's settled to one side.
Don't confuse this with "replace toner," which is a harder stop - the printer has determined the cartridge genuinely can't reliably lay down toner anymore, and it will usually refuse to print, or print visibly faded pages, until you swap it.
Toner or Drum? How to Tell Which One's Actually Failing
This is where a lot of people replace the wrong part. If your prints are uniformly faded or streaky across the entire page, that's toner. If you're seeing a repeating mark or spot that recurs at a fixed interval down the page often every 3 to 4 inches, that's the drum, not the toner, because it means something on the drum's rotating surface is damaged or contaminated and it's stamping the same defect onto the page on every rotation. Replacing toner won't fix that; you need the DR-series drum unit for your model.
Genuine vs Compatible Toner: The Honest Trade-off
Genuine Brother TN cartridges cost more upfront but come with a chip pre-programmed to communicate accurately with the printer, meaning toner-level readouts and page-count tracking are reliable, and there's no warranty ambiguity if something goes wrong with the printer itself. Compatible or remanufactured cartridges are typically 40-60% cheaper and, from a strictly print-quality standpoint, many perform close to identically on text-heavy documents, but yield consistency varies far more by brand of compatible than most sellers advertise, and some do require that manual counter reset mentioned above. If you're printing high volumes for a business where downtime matters, genuine is the safer default; for light home use where a slightly early "replace toner" prompt is a minor inconvenience, compatible cartridges are a reasonable way to cut cost per page.
How to Manually Reset the Toner Sensor
Brother printers track toner use by counting pages, not by measuring what's actually left in the cartridge. The reset gear inside a new cartridge is meant to tell the printer "I'm full" the moment it's installed - but that gear only trips once, and on compatible or remanufactured cartridges it sometimes doesn't communicate with the sensor at all. When that happens, you'll install a full cartridge and still get a "Replace Toner" message. A manual reset clears the counter without needing that automatic handshake.
Only reset the counter if you've actually replaced the toner. Resetting doesn't refill anything - it just tells the printer the cartridge is full. Reset without replacing and you'll lose your low-toner warning entirely, so you'll find out the hard way, mid-print, that it's actually empty.
Button labels shift slightly across firmware revisions even within the same series, so if a step doesn't match your screen exactly, look one menu level up rather than assuming the whole sequence is wrong.
HL-L23xx / DCP-L25xx Series (LED Panel, No Touchscreen)
Covers models like the HL-L2350DW, HL-L2370DW, HL-L2375DW, and DCP-L2550DW.
- Open the front cover, ignore the "Cover is Open" message and leave it open.
- Press Back and Go at the same time, hold for 1–2 seconds, then release both.
- Immediately press Back again on its own. A reset menu should appear.
- Use the Down arrow to scroll to "TNR-HC," then press OK.
- When "Reset/Exit" appears, press Down again to confirm.
- "Accepted" confirms the reset. Close the cover.
If the reset menu never appears after a few attempts, go to Menu → General Setup → Replace Toner → Continue instead - it won't reset the counter to 100%, but it clears the block so you can keep printing.
HL-L27xx / MFC-L27xx Series (Touchscreen)
Covers models like the HL-L2395DW, MFC-L2750DW, and MFC-L2730DW.
- Open the front cover and leave it open.
- Press Return and Cancel (X) together, hold for 1–2 seconds, release both.
- Immediately tap Return again on its own. A hidden reset menu appears on the touchscreen.
- Tap the TNR-HC option on the screen.
- Tap Yes to confirm the reset.
- Close the front cover and run a test print.
Business Laser Series (HL-L5xxx / HL-L6xxx)
Covers models like the HL-L5100DN, HL-L5200DW, HL-L6200DW, and HL-L6400DW.
- Open the front cover and leave it open.
- Press Secure, then while still holding Secure, press Cancel. These often don't register as a true simultaneous press, so press Secure a fraction of a second first.
- Use the Up/Down arrows to select the toner cartridge type you installed.
- Press OK (or the Up arrow, depending on firmware) to confirm the reset.
- "Accepted" appears on the display. Close the cover.
Related Guides
How to Replace the Drum Unit on a Brother Printer (Complete Guide)
The natural next click for anyone who read the toner-vs-drum section above and realises their streaking issue is actually the drum, not the toner.
How to Replace Toner in Brother MFC-L2750DW (Complete Beginner Guide)
A video walkthrough of the same process on one specific popular model — good for readers who want to watch rather than read, or who own that exact printer.
How to Connect Brother Printer to WiFi – Quick Wireless Setup Guide
Common follow-on search for anyone who just replaced toner on a printer they're also still setting up.
Frequently Asked Questions
Do I need to replace the drum every time I replace the toner?
No, that's the entire point of Brother's separate-parts design. The drum is built to outlast three to four toner cartridges. Replacing it every time you swap toner wastes money for no print-quality benefit.
Is toner replacement messy?
Not if you don't puncture the cartridge. It's a sealed unit until it's spent, at which point most models still keep the used toner mostly self-contained rather than loose powder falling out.
Does this process work the same on colour laser Brother printers?
The mechanics are the same, but colour models have four separate toner cartridges (black, cyan, magenta, yellow) and sometimes a single shared drum unit or belt unit rather than four individual drums. Check your specific model, since this is one area where Brother's lineup does genuinely vary.
What should I do with the empty toner cartridge?
Use Brother's free mail-in recycling programme or drop it at a Staples or Office Depot recycling kiosk, see the note in the step-by-step section above.