Fix Epson XP 430 Printer Not Printing Issue [Windows & Mac]

When you are unable to print on your printer, there could be several reasons. Even if it is one of the biggest brands, facing errors is common. Many issues can cause your printer not to print. In this guide, we will define why this technical error occurs and how you can resolve it within minutes.
What are the Possible Reasons for Printer Not Printing?
Many different reasons can cause the Epson printer not to print. Some of them include the following.
- Dirty/ Clogged Print Head
- Loose Cable/ Ethernet Connection
- Outdated or Incompatible Driver
- Incompatible Ink cartridges
- Incorrect Installation of Cartridges
These are the possible causes behind this issue. Now, you know where to look to resolve this error.
What are the Resolving Methods to Fix the Error?
Whether it is a minor or major issue, both can lead a printer not to print the documents. It is strictly suggested to perform a basic check and then proceed to the troubleshooting steps. Below are the five important fixes to try as the primary requirement.
Method 1: Reboot the Printer
It is one of the primary and overlooked methods to resolve basic errors.
- Here, you need to power off the printer.
- Then, you need to disconnect the power supply.
- Let it cool down for 10 minutes and turn it on again.
- You are performing a reset process right now.
- If something goes wrong, it will allow the printer to fix itself.
- After that, turn on the print system and connect the cables.
- In the end, print a document to test if the print is fine.
Solution 2: Check the Connectivity
The other basic yet effective solution is to verify if the connections are interrupted. The cable connecting the printer and PC is necessary to maintain connectivity. Connect it right to get your printing done; else, you will be stuck with the problem. The USB cable and the ports in which it is inserted must both be functional. After a proper connection, if it still does not print, then replace the cable, as it may be defective.
Solution 3: Update the Printer Drivers
The drivers are the essential software required for a printer setup. It is a program responsible for connecting the printer to the PC. It simply means if there is an error with the driver (corrupt/outdated/ incompatible/ missing), you won’t be able to complete the print jobs. So, you will need to verify and do the following.
- Go to the official website and type the model number.
- Click on the Search button to open the Printer List.
- Then choose your model from the list.
- Now, a new navigation page will open on the screen.
- After that, select the driver version on the following page.
- Tap the Download button and get the driver.
- Now, complete the installation process with on-screen instructions.
If it is not resolved even after updating the drivers, then the problem lies elsewhere. Try the other methods to get your printer back to printing.
Solution 4: Set Your Printer As Default
Sometimes, the print system refuses to go through the process when it is not set as default. Here are the troubleshooting steps.
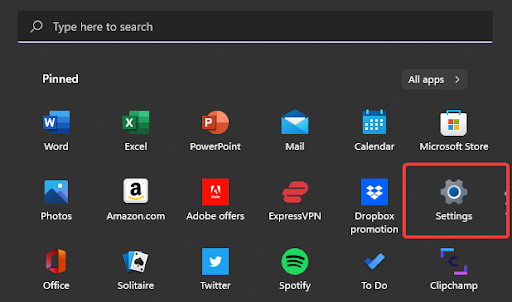
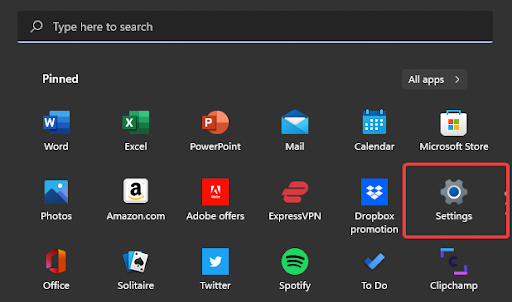
- Click the Windows key in the first step.
- Then, you have to open the Settings app.

- Now, tap Bluetooth & Devices on the left panel.
- After that, choose the Printers & Scanners on the right.

- Next, choose the model you are using.
- In the end, click the Set as Default button.
Once you have completed the steps, uncheck the “Let Windows manage my default Printer” box to allow the system to use your most recent printer.
Solution 5: Replace the Ink Cartridge
If the ink in the cartridge has dried out or is not suitable for the printer, get a new one. Always get a genuine one from a similar brand to prevent errors. Always leave the cartridges inside the printer even if they get empty. It enables the printhead to dry out.
- First, navigate to the control panel.
- Go to the Printers and Scanners window.
- Then, you need to right-click on your model.
- After that, go to the Options menu.
- Now, you have to choose the Print option.
- In the next step, right-click on your model.
- Click on the Printing Preferences option.
Read Also:- 5 Common Epson Printer Errors and Fixes | Printer Tales
- Thereafter, you need to navigate to the Manage tab.
- Hit on the Epson Printer Preferences Maintenance option.
- In the next step, tap on Head Cleaning.
- Click on the Start button and do the on-screen instructions.
These are the basic troubleshooting tricks that you can try. Now, let’s check out the resolving methods for Windows and Mac devices.
How to Resolve Epson Printer Not Printing on Windows?
Before starting, you need to check if you have provided the correct paper size settings. Also, check if the ink cartridges are empty or incorrectly installed. Then, try out the tricks mentioned below.
- Choose one of the following:
a. Windows 7: Click and select Devices and Printers. Right-click your printer and select Printing Preferences.
b. Windows 8.x: Go to Apps and click on the Control Panel. Next, navigate to Hardware and Sound and open Devices and Printers. Right-click your model and tap on Printing Preferences.
c. Windows 10: Right-click the Start icon and tap on the Control Panel. Go to Hardware and Sound, then open Devices and Printers. Right-click your model name. After that, tap on Printer Preferences.
d. Windows XP: Tap on Start and click on the Control Panel. Click Printers and Other Hardware if prompted. Now, tap on Printers and Faxes. Right-click the printer and choose Printing Preferences.
e. Windows Vista: Tap on the Windows icon and click on the Control Panel. You can also navigate to Settings. Now, choose the Control Panel and click on Printer (under Hardware and Sound) or Printers. Right-click on your model and tap on Printing Preferences. - Once selected, tap the Maintenance tab.
- Next, click on the Extended Settings option.
- After that, you need to navigate to the Settings area.
- And tap on the Skip Blank Page setting or checkbox.
- Click on OK as necessary to restore the settings.
The steps given above will help if the printer is not printing or printing blank pages in Windows.
How to Resolve Epson Printer Not Printing on Mac?
If you are using a Mac device and the printer is unable to print or is printing blank, you can try out these steps. All these will help you fix the issue.
- First, navigate to the Apple menu.
- Next, you need to choose System Preferences.
- Now, tap on the Print & Scan, Print & Fax, or Printers & Scanners option.
- After that, choose your model, then tap on Options & Supplies.
- Then, you have to click on Select Driver or Options.
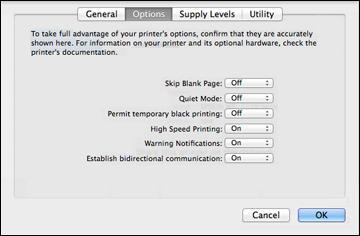
a. The following screen will appear now:

- On the prompted screen, change Skip Blank Page to On.
- In the end, complete the procedure by clicking on OK.
If you are still facing issues even after going through the guide, connect with Printer Tales experts. You can contact us at +1-877-469-0297/ +44-800-054-8150 or (info@printertales.com) for professional assistance.
Frequently Asked Questions
Why is my Epson printer not printing when there is enough ink?
It's possible that your printer didn't identify the new ink cartridge. Also, it could have happened due to the misreading of the ink level sensor as empty. However, you can fix the built-in ink-checking system by applying a quick cartridge reset. You can do it by opening the printer cover and holding the Ink button.
What are the causes behind the Epson printer printing blank pages?
Try these fixes if blank pages unexpectedly print:
Make that the paper size settings are correct.
Then, check if the printer software settings are correct.
Select the Forgo Blank Page setting.
Select Skip Blank Page setting in print software.
Can I reset the Epson XP 430 printer to fix issues?
Reset Epson 430:
First, tap the Home button.
Click the left or right arrow button.
Then, choose Setup and click on OK.
Now, tap the up or down arrow button.
Next, click on Restore Default Settings.
Finally, click the OK button.

