How to Fix Epson Printer Not Printing? [7 Easy Methods]
If your Epson printer is not printing, there may be driver issues. A technical defect in the driver may occur due to a communication error between the PC and the printer. It will start with Banding, Blurry Prints, Incorrect Colors Appearing, Faded Prints, or Grainy Prints, then lead to an unresponsive printing system. However, despite these crucial errors, you can resolve these issues with the simple methods listed in this guide.
Before you start, make sure to verify these requirements:
- Ensure your printer is On.
- The printer and PC are connected.
- Make sure the ink cartridge is well set.
- Paper trays are in position.
- Ensure the printer LCD is showing no errors.
- The printer’s print head is clean.
Solutions to Resolve Epson Printer Not Printing Problem
After following the primary steps, try fixing the problem using advanced troubleshooting methods. Also, you do not need to apply all the techniques. If one of these fixes the error, move on to operating the print jobs.
Solution 1: Set Your Printer As Default
When multiple printing systems are connected to the system, you must set it as the “Default.”
Here is how you can change the print settings to clear the error.
- Click on the Windows logo on your system and then the Settings icon.
- Go to the Devices option and then the Printers and Scanner section.
- Locate your device from the list and choose the Manage option.
- Click the button "Set as default." If you cannot see this, follow the next step.
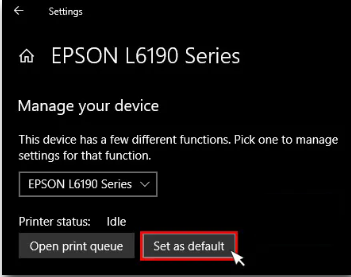
- Remove the checkmark from the "Let Windows manage my default printer" box.
- It will allow you to set your printing system as default on the PC.
- Try printing a file and check if the error message still appears on the screen.
Solution 2: Check for Low Ink in the Cartridge
You must ensure it has enough ink to print many documents. A low ink level in the cartridge can also cause an error. You can download Epson Status Monitor 3 tool to view the status and the ink levels. Here is how to set it up:
- First, open the Window's Control Panel from the search box.
- Then, choose Devices and Printers to view all the available devices.
- Right-click on your device and choose the "Printing Preferences" option.
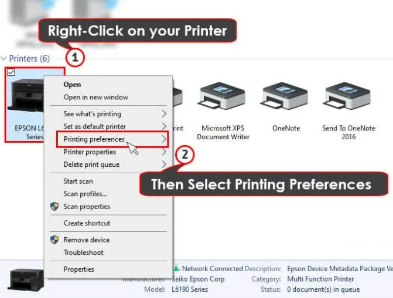
- Go to the Maintenance tab now.
- Then, click on the EPSON Status Monitor 3 option.
- Now, you can view the ink level in each cartridge.
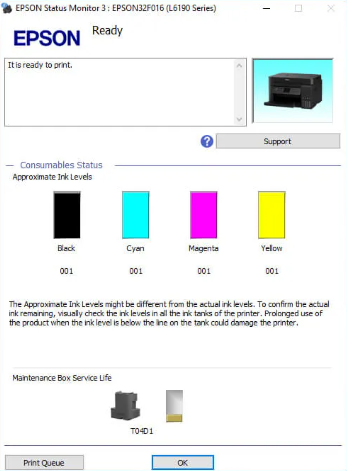
- Now, refill the ink cartridges if it is low.
Solution 3: Reinstall Your Printer On the PC
The printing error also occurs due to incorrect installation. The reinstallation will help you to reset the print and PC settings. Here are the instructions to do so.
- Visit the Control Panel and select Programs.
- Then, navigate to Programs and Features.
- Right-click on your device after that.
- Thereafter, hit on the Uninstall/Change button.
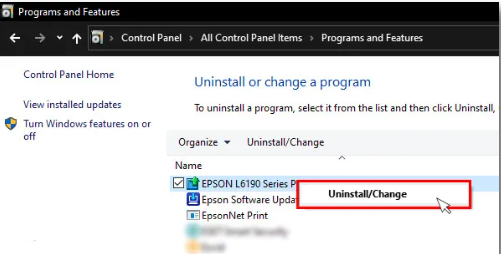
- Switch off the device and PC in the next step.
- Now, you can restart them after a few minutes.
- Then, connect the device to the system.
Read Also:- How to Fix Epson Printer Filter Failed Error on Mac OS?
- And reinstall the setup on the system.
- Tap the Start menu, and launch the Settings app.
- After that, select the Devices option.
- Select the Printers and Scanners option.
- Click "Add a printer or scanner."
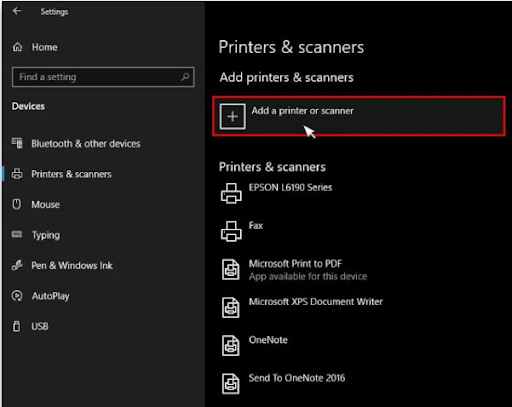
- Now, follow the steps as instructed on the screen.
Solution 4: Ensure the Correct Port Is Selected for the Printer
During the setup installation, ports must be selected correctly. You can assign the proper port without reinstalling the setup using the following instructions.
- Go to the Control Panel window first.
- Then, choose Devices and Printers.
- Select your device, then right-click on it.
- Now, choose Printer Properties.
- Go to the Ports tab of the properties window.
- Thereafter, click on "Add Port."
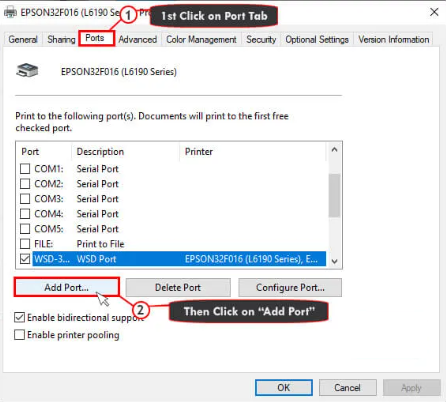
- Go to the Printer Ports settings.
- Then, choose the "Standard TCP/IP Port" option.
- Click on the New Port button.
- Then, hit the Next button on the window.
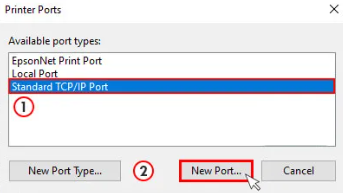
- Now, hit the Finish button.
- Click Apply and restart both devices.
- Check if the error message is clear or not.
Solution 5: Update Your Printer Driver On the Computer
An out-of-date driver is also one of the potential causes of the printing issue. In order to clear the error status, you need to update the driver.
- On the search box, type Device Manager.
- Then, you need to press the Enter key.
- Now, go to the Printers category.
- After that, you need to select your device.
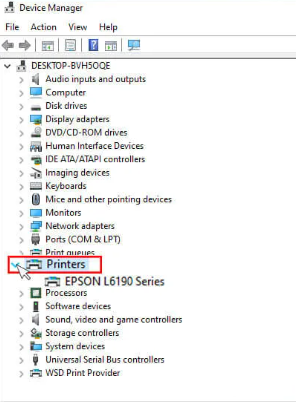
- Right-click on your device in the next step.
- Now, choose the Update Driver option.
- Select the Search Automatically option.
- Now, initiate the driver update.
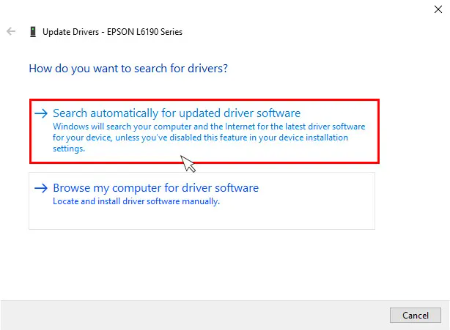
- Follow the instructions on the screen.
- Complete the driver update procedure.
Solution 6: Verify the Print Spooler Settings
The print spooler service on your PC manages the print jobs. Also, it operates the communication between the PC and the printing system. If you have turned it off, your device will not process any print jobs. Here is what you should do:
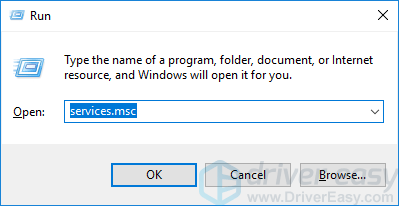
- Press the Windows logo key and the R button.
- Now, the Run command box will open.
- Then, type “services.msc” and tap Enter.
- Thereafter, the Services window will launch.
- Next, double-click the Print Spooler option.
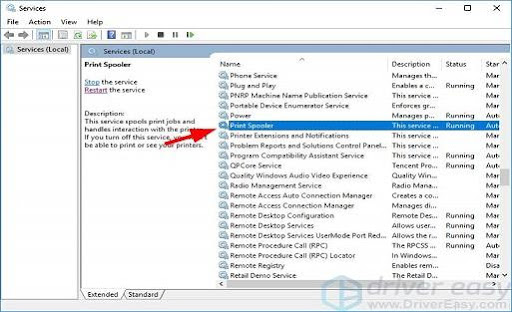
- Set the Startup type to Automatic.
- The Service status will now appear as Running.
- If it doesn’t, set the Startup Type to Automatic.
- Then, click the Start button.
- Tap the OK button in the next step.
- Check and see if the Epson printer is able to print.
Solution 7: Clear All Print Jobs
Sometimes, the error is caused due to too many aligned print jobs. If you need to clear the issue, do the following:
- Press the Windows logo key and the R button.
- Then, type “services.msc” and click Enter.
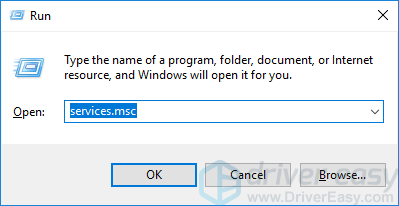
- It will launch the Services window.
- Now, double-tap the Print Spooler option.
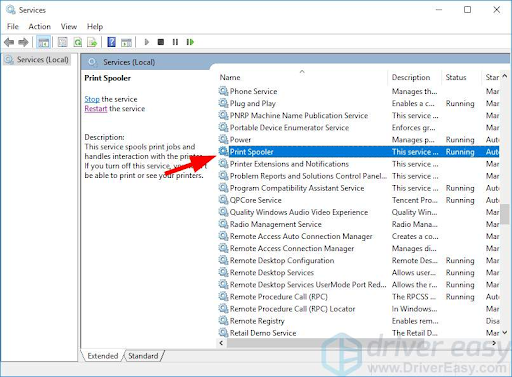
- Tap on the Stop button in the next step.
- After that, click the OK option.
- Now, minimize the Services page.
- Then, launch the File Explorer window.
- Tap the Windows logo key and E at the same time.
- Type “%windir%\System32\spool\PRINTERS.”
- Thereafter, delete all the files in this folder.
- Open the Services window now.
- Double-tap the Print Spooler service.
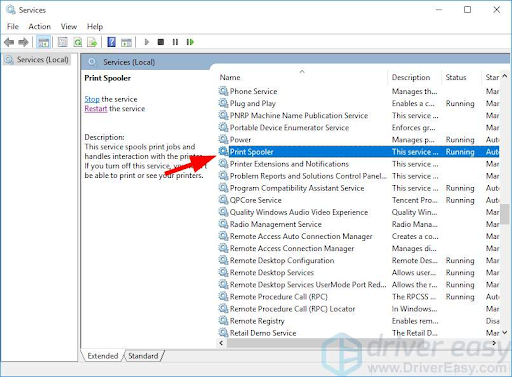
- Tap the Start button in the next step.
- Once you have started the service, tap OK.
- Save the changes and close the prompted screen.
- Close all the windows and turn off the PC.
- Power off the printing system as well.
- Unplug the power cable from your PC.
- Leave the device to rest.
- Connect the power cable to your print system.
- You need to turn it on after that.
- Power on the PC and see if the error exists.
Now, you have got seven simple and quick methods to resolve the Epson printer is not printing issue. Verify your devices with any of the methods mentioned in the guide. If you cannot understand the procedure, simply connect with printer experts at Printer Tales. We are available via email at “info@printertales.com” or call us at +1-877-469-0297” and +44-800-054-8150.
Frequently Asked Questions
Why is my printer not printing even if the ink level is fine?
There are a few causes that could create this issue, such as Empty toner cartridges that need replacing. Another cause could be dislodged ink or toner cartridges from their proper place. Also, it could be due to the incorrect paper size.
What to do if my Epson printer is unable to print?
You will need to print a nozzle check pattern to see if they are clogged. If required, check the print head for leakage. Also, you have to make sure the paper size, layout settings, and orientation in the software are given correctly.
How do I reset the Epson printer to factory settings?
Reset the printer to factory settings:
Turn on the printing system.
Disconnect the power cable from the wall outlet.
Wait for 15 seconds now.
Plug your power cable into the back of the printer.
Then, connect the printer back to the wall outlet.
Now, turn the printer back on.
In the end, run a test print.

