How to Install and Connect an Oki Printer to WiFi?
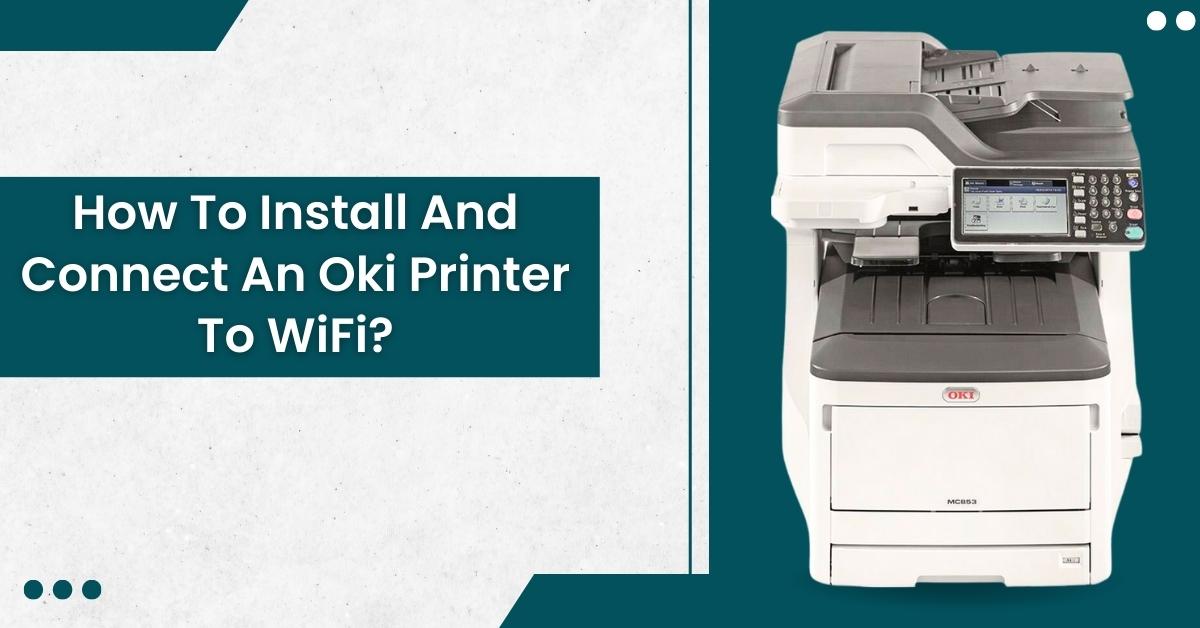
Oki printers are known for their multifunctionality as they can handle multiple business tasks, such as printing, faxing, copying, and scanning documents. This printer comes with wireless support, meaning you can print with it without moving away from your workspace.
If you recently bought an Oki printer, you may need to look into its installation guide and how you can connect it to a wireless network. However, that may not be easy for you, especially if this is your first time using an Oki printer. Well, why stress when you have Printertales with you? This guide covers everything from installation to establishing a WiFi connection for an Oki printer.
How To Install An Oki Printer?
Installing an Oki printer involves setting up the printer driver. This process can differ based on whether you're using Windows or macOS. So, let's see the process for this, which will help you install your Oki printer.
Setting The Printer Driver
As already mentioned, the process for setting up the printer driver can vary depending on whether you're using Windows or macOS. Let's verify the steps for Windows, later followed by the steps for macOS.
For Windows PCL Print Drivers
- Firstly, you need to open "Devices and Printers."
- Next, right-click on the "OKI C650 PCL" icon. Then, select the "Printer Properties" option.
- After that, tap on the "Device Options" tab.
- Moreover, for a network connection, press "Get Printer Settings."
- Also, for a USB connection, enter the tray number and minus them with the MP tray in "Installed Paper Trays."
- To understand this, you've three expansion tray units mounted. In that case, your usable trays will be 1/2/3/4. Hence, you'll need to enter “4.”
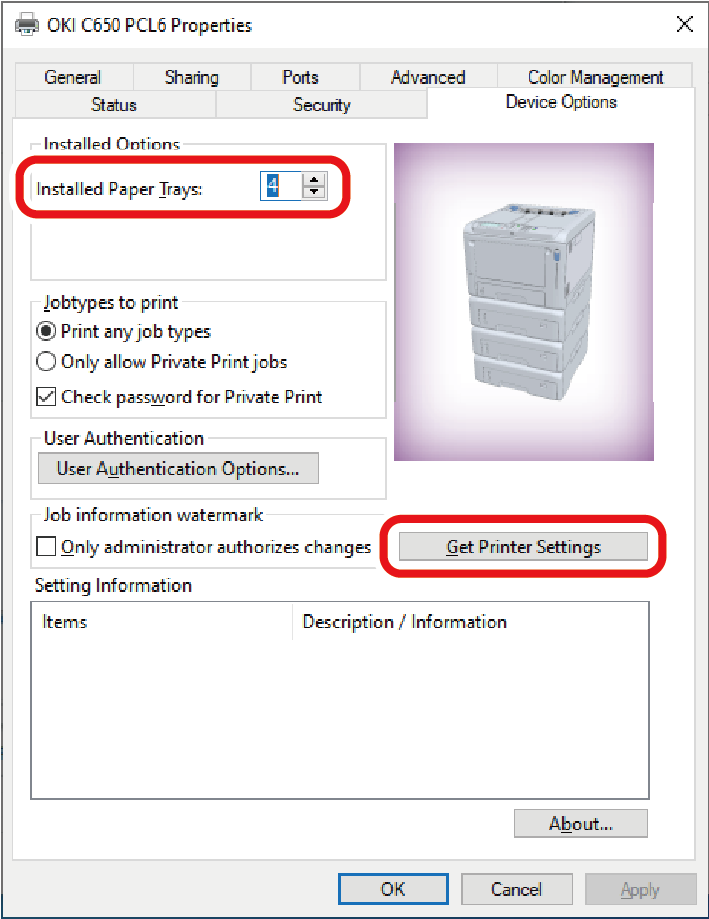
- Finally, hit "OK."
For Windows PS Printer Driver
- Firstly, navigate to "Devices and Printers" on your computer.
- Next, right-click on the "OKI C650 PS" icon. Then, select the "Printer Properties" option.
- After that, tap on the "Device Settings" tab.
- Now, for a network connection, from "Installable Options," click on "Get installed options automatically." Then, hit "Setup."
- For a USB connection, choose the corresponding value in "Available Trays" of the "Installable Options."
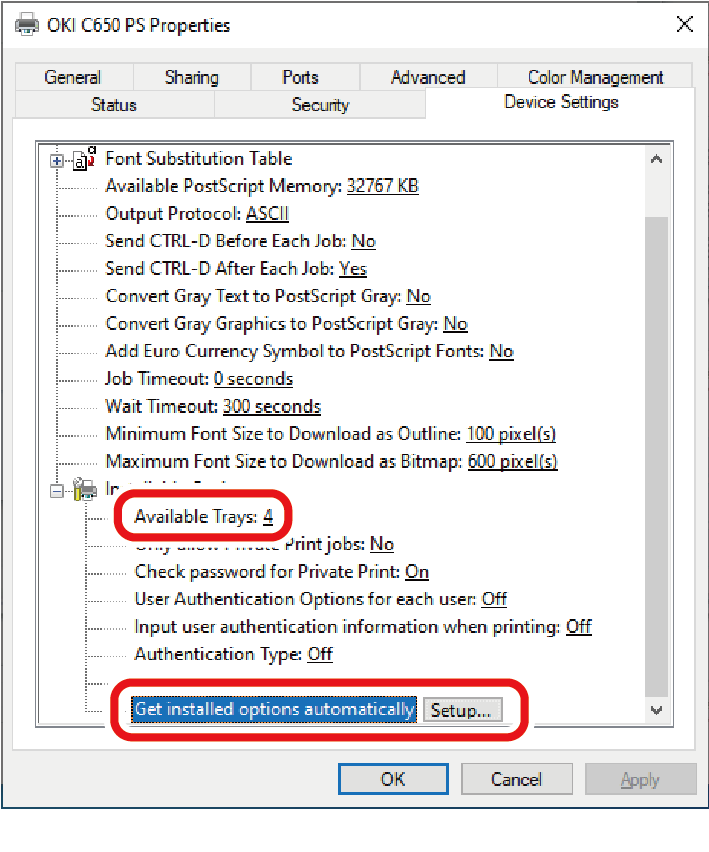
- Finally, hit "OK."
For macOS
- Firstly, select the "System Preferences" option from the Apple menu.
- Then, tap on “Print & Scan.”
- Next, choose the machine. Then, press “Options and Supplies.”
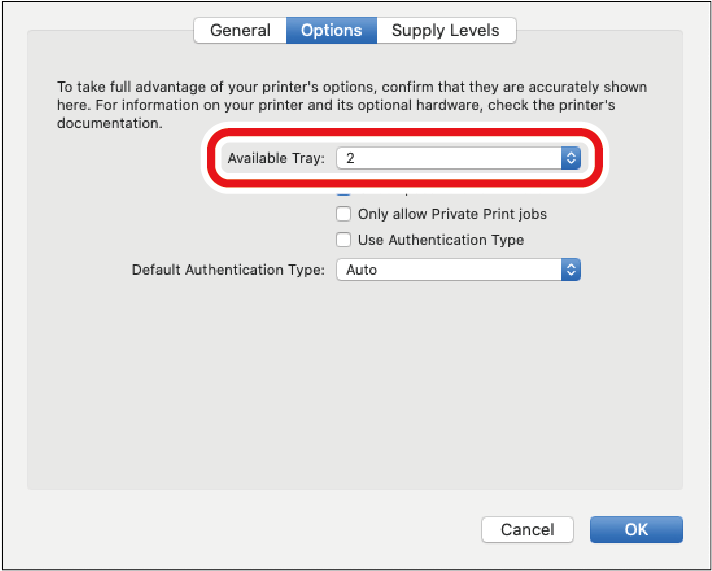
- After that, select “Options.”
- Now, tap the number of the total trays from "Available Trays. Then, hit "OK."
Setting Up An Oki Printer: How To Install A Driver And Software On A Computer?
You can use your Oki printer to perform multiple functions such as fax, scan, and print. However, to prepare the printer to perform these functions, you must install the scanner, fax, and printer drivers that work with your computer.
You can install the driver using the "Software DVD-ROM." Meanwhile, you can install other utility software using the "Software DVD-ROM."
For Windows (Driver Installation)
Before you start these installations on your Windows device, it's essential that you connect the printer to your internet. Or, you can connect your printer to a computer system using a USB cable that comes with the Oki printer. Now, you're ready for the installation.
- Firstly, insert the "Software DVD-ROM" included with your printer into your computer.
- Then, once "Auto Play" shows on your screen, tap “Run setup.exe.”

- Next, from the drop-down, choose a language.
- After that, make sure to read the license agreement. Once done reading, press the "Accept" button.
- Moreover, read out the "Environment advice." After that, press the "Next" button.
- Now, select "USB" or "Network (Wired/Wireless)" as per the connection method of the computer and machine. Then. Hit the "Next" button.
- Next, select the printer's model name. Then, hit “Next.”
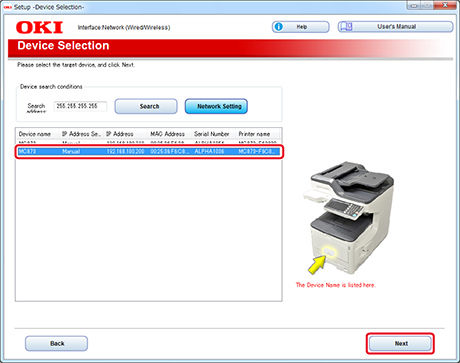

- Once the installation ends, ensure to confirm that it is installed successfully. To confirm this, tap on “Printing Test.”
- Select your printer for test printing. Once you're done selecting, tap on “Printing Test.”
- So, ensure the test printing went smoothly. Once it finishes, hit “OK.”
- Next, press the "Complete" button.
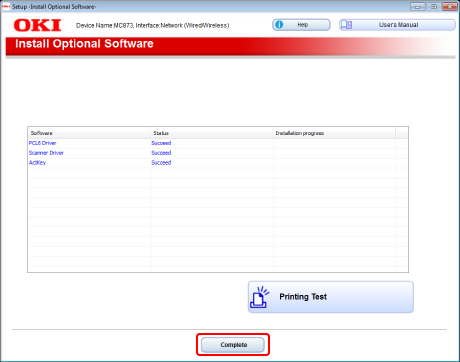
- After that, hit “Next.”

- Also, if a dialogue box appears, tap “Yes.”
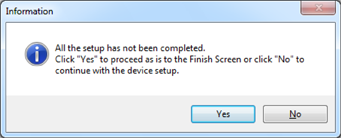
- Finally, hit the "Exit" button.

For Windows (Software Installation)
You can install the utility software using the "Software DVD-ROM." And just like driver installation, you need to connect your printer to a computer through a wireless network or USB cable for software installation.
- Firstly, insert the "Software DVD-ROM" included with your printer into your computer.
- Then, once "Auto Play" shows on your screen, tap "Run setup.exe."

- Next, from the drop-down, choose a language.
- After that, make sure to read the license agreement. Once done reading, press the "Accept" button.
- Moreover, read out the "Environment advice." After that, press the "Next" button.
- Now, select "USB" or "Network (Wired/Wireless)" as per the connection method of the computer and machine. Then, hit the "Next" button.
- Also, if the "Windows Security Alert" dialogue box appears on the screen, tap “Allow access.”
- Next, select the printer's model name. Then, hit "Next."
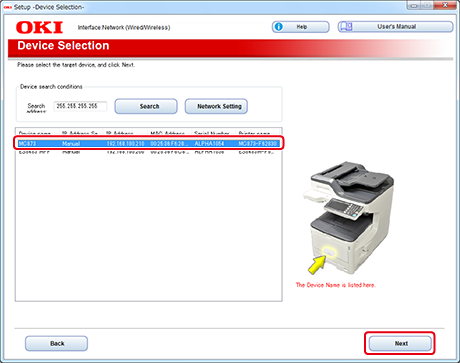
- Then, hit the "Custom Install" option.
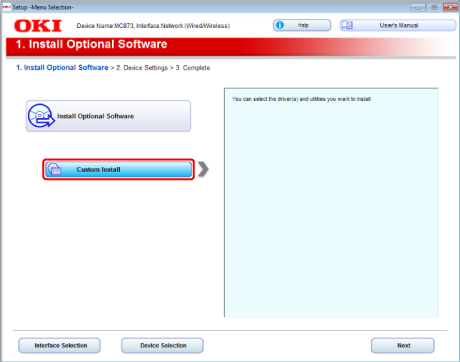
- After that, press "Separate Install."

- Moreover, select the software or driver to install. This will start the installation process.
- Now, choose the plug-ins you're looking to install. Then, hit "Install."
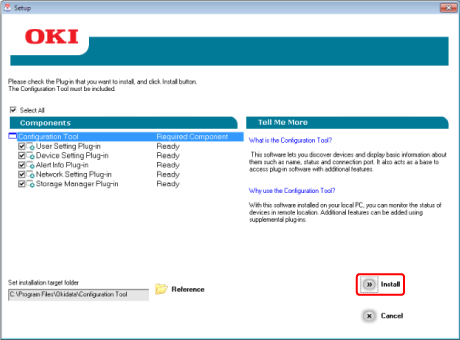
- Finally, hit the "Close" button once the installation ends.
For Mac OS X (Driver Installation)
Now, after learning about Windows installation, let's check how to install the scanner driver and printer driver in Mac OS X.
Also Read: How To Connect A Konica Minolta Printer to a Computer? (Windows, macOS, And Linux)
Installing The Mac OS X Scanner Driver
- Firstly, ensure your printer and computer are connected and the printer is turned on.
- Then, insert the "Software DVD-ROM" included with your printer into your computer.
- Next, you need to double-click the "OKI" icon on your desktop.
- After that, hit "Drivers > Scanner." Then, double click "Installer for OSX10.6-10.7" or "Installer for OSX10.8-10.10" as per your Mac OS version.
- Moreover, hit “Continue.”
- Now, read out the "displayed content" on the screen. Then, press the "Continue" button.
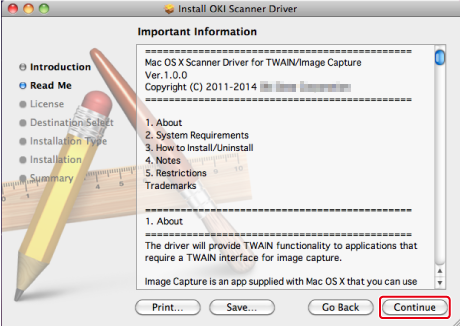
- Next, make sure to read the license agreement. Once done reading, press the "Agree" button.
- After that, hit the "Install" button. Also, to change the location of the driver installation, hit "Change Install Location."
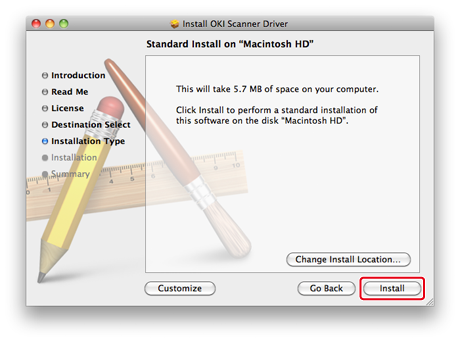
- Then, type in your administrator password and name. After that, press “OK.”
- Moreover, tap “Continue Installation.”
- Finally, hit the "Restart" button.
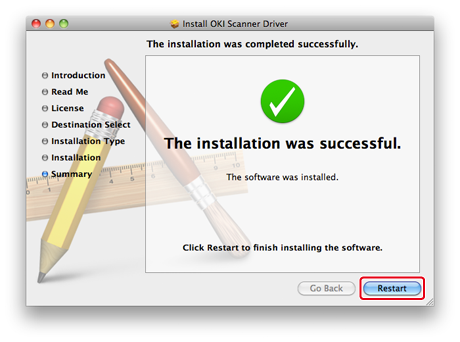
Installing The Mac OS X Printer Driver
- Firstly, ensure your printer and computer are connected and the printer is turned on.
- Then, insert the "Software DVD-ROM" included with your printer into your computer.
- Next, you need to double-click the "OKI" icon on your desktop.
- After that, hit "Drivers > PS." Then, double-tap on the "Installer for OSX" option.
- Moreover, type in the administrator password. Then, hit “OK.”
- Also, to finish the installation smoothly, make sure to follow the on-screen instructions.

- Now, from the Apple menu, click on “System Preferences.”
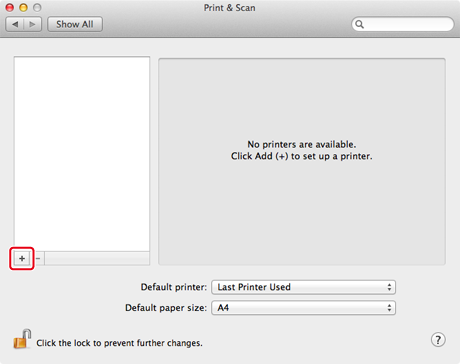
- Then, tap “Print & Scan.”
- Next, hit "+" and select the "Add Printer or Scanner" option from the menu.
- After that, hit “Default.”
- Moreover, select your printer from the list. Also, ensure "OKI MC873(PS)" is displayed for “Use.”
- Now, hit the "Add" button.
- When you get the confirmation dialogue box on your screen, press “OK.”
- In addition, ensure your device is added to the "Printer." And, "OKI MC873(PS)" must be displayed for "Kind."
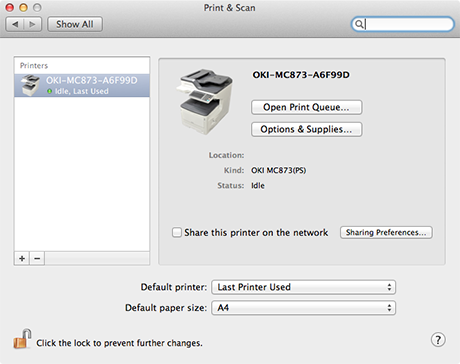
- Hit "Open Print Queue…".
- Finally, click "Print Test Page" from your "Printer" menu. This will help you know if your Oki printer is working or not.
For Mac OS X (Software Installation)
- Firstly, insert the "Software DVD-ROM" included with your printer into your computer.
- Now, head to the "OKI" section and double-tap the "Utilities" folder.
- Finally, copy the utility folder you want to install by dragging it to whatever location you want.
How To Connect An Oki Printer To WiFi?
So, we are now done with the installation part of an Oki printer. However, for the convenient functioning of this Multifunction Printer (MFP), it's essential you connect it to a WiFi or wireless network. So, let's see how you connect this printer to a built-in network port.
Using A Powerline Connection
PowerLine network adapters are known to use the main cable in order to extend the network. So, for this, you require at least two adapters to plug into the three-pin main sockets. You need to plug one of the adapters close to the router. Meanwhile, the other adapter needs to be close to your Oki printer. Once you finish setting this up, the adapters will automatically detect each other. This will help form a network using the current mains wires.
Also, each PowerLine adapter comes with a network port that will help connect the network cable from one adapter to your router. Meanwhile, you can connect the other adapter to your printer. This will help you establish a network in your Oki printer.

Using A Wireless Adapter
The next way to connect your printer to WiFi is by using a wireless adapter. This will help connect your printer to a network wirelessly, which is quite convenient. So, to start this, firstly, connect the wireless adapter to the network port of your printer. You can do this by using a network cable that will help connect the adapter wirelessly to your network. You have two ways to perform this:
- By typing in the network details as well as the password manually.
- By pressing the WPS button on your adapter.

Connecting A Printer Having Only A USB Port
So, your printer doesn't contain a built-in network port. In that case, you still have the option to connect your printer to a network. You can do this by using a USB print server.
However, remember that most wireless printer servers only support Postscript/OKI PCL printers. Generally, they don't offer any support for GDI.
Using A USB Wireless Print Server
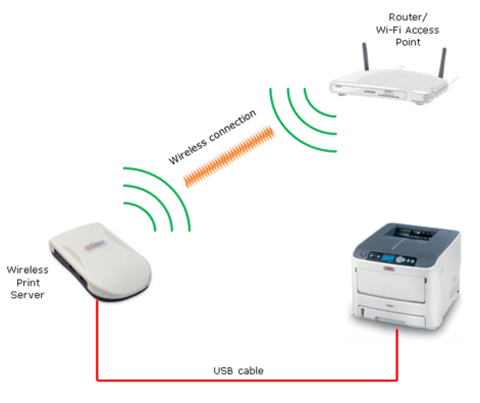
Connect the print server to your Oki printer through a USB cable. After that, connect the print server to your network wirelessly through the wireless access point. This step is quite similar to using a wireless adapter.
Conclusion
You can now connect an Oki printer to WiFi and complete its installation process. Before installing the driver and software, connect your Oki printer to a WiFi network. Also, check out the manual that comes with your printer, as it will contain all the instructions that will help you complete the installation process.

