How to Connect Canon Printer to WiFi – Easy Wireless Setup
Getting a Canon printer onto your WiFi network takes less than five minutes once you know the right method. Most Canon printers support three setup paths: the Wireless LAN Setup directly from the printer's touchscreen or button menu, the Canon PRINT Inkjet/SELPHY app on your phone, and the WPS push-button method if your router supports it. Choose based on your printer model and what's most convenient—all three are covered step by step below.
Which Setup Method Is Right for Your Canon Printer?
Before diving into steps, a quick diagnostic saves time:
- Printer has a color touchscreen? Use the Wireless LAN Setup directly from the printer menu — it's the most reliable path for most PIXMA and MAXIFY models.
- Printer has no screen or minimal buttons? Try the WPS push-button method, as long as your router has a WPS button.
- Prefer doing it from your phone? The Canon PRINT app on iOS or Android walks you through the entire setup without touching the printer menu.
- Setting it up remotely or for someone else? The Canon IJ Network Tool on PC or Mac gives you the most control and visibility into what's happening.
Real-world note: The WPS method is the fastest—under 60 seconds—but it's also the one most people overlook. If your router has a "WPS" button (usually on the back or side), try that first before navigating menus.
Method 1: Wireless LAN Setup via Printer Screen (Most Common)
This works for most mid-range and higher Canon PIXMA, MAXIFY, and imageCLASS models with an LCD panel.
Step 1 – Access Network Settings
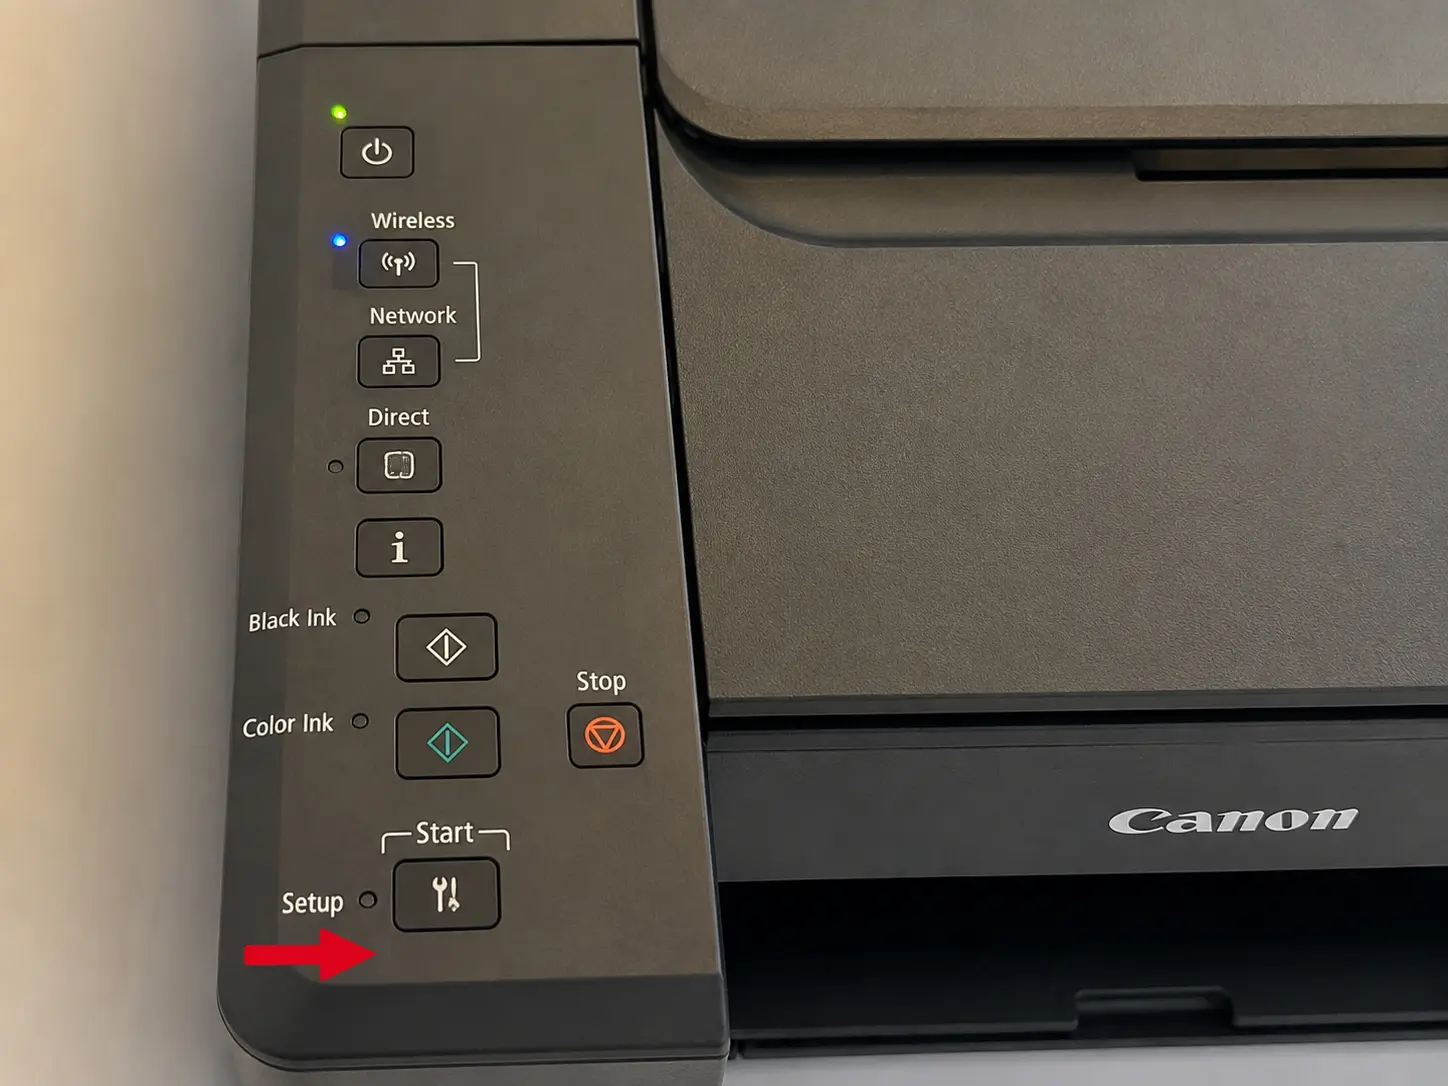
- Press the Menu or Setup button on your printer (the exact label varies by model).
- Navigate to Device Settings → LAN Settings → Wireless LAN Setup.
- Select Standard Setup (not Easy or WPS unless you want those specifically).
Step 2 – Select Your Network
- The printer will scan and display available WiFi networks. Select your home or office network SSID.
- Enter your WiFi password using the on-screen keyboard. Canon's touchscreens let you switch between uppercase, lowercase, and symbols—take your time here, because a single wrong character means starting over.
Step 3 – Confirm the Connection
- Press OK or Connect. The printer will attempt to join the network, which takes 20–30 seconds.
- Once connected, the WiFi indicator light on the printer should turn solid blue (on most PIXMA models). A blinking light means it's still connecting; if it goes orange or red, the password was rejected.
Print a Network Configuration Page to verify: Go to Settings → Device Settings → Print LAN details. This page shows your printer's assigned IP address—save it, you'll want it if you ever need to access the printer's embedded web interface.
Method 2: WPS Push-Button Setup (Fastest)
WPS (Wi-Fi Protected Setup) lets the printer and router handshake without entering a password at all. Canon supports this on nearly every wireless printer built after 2015.
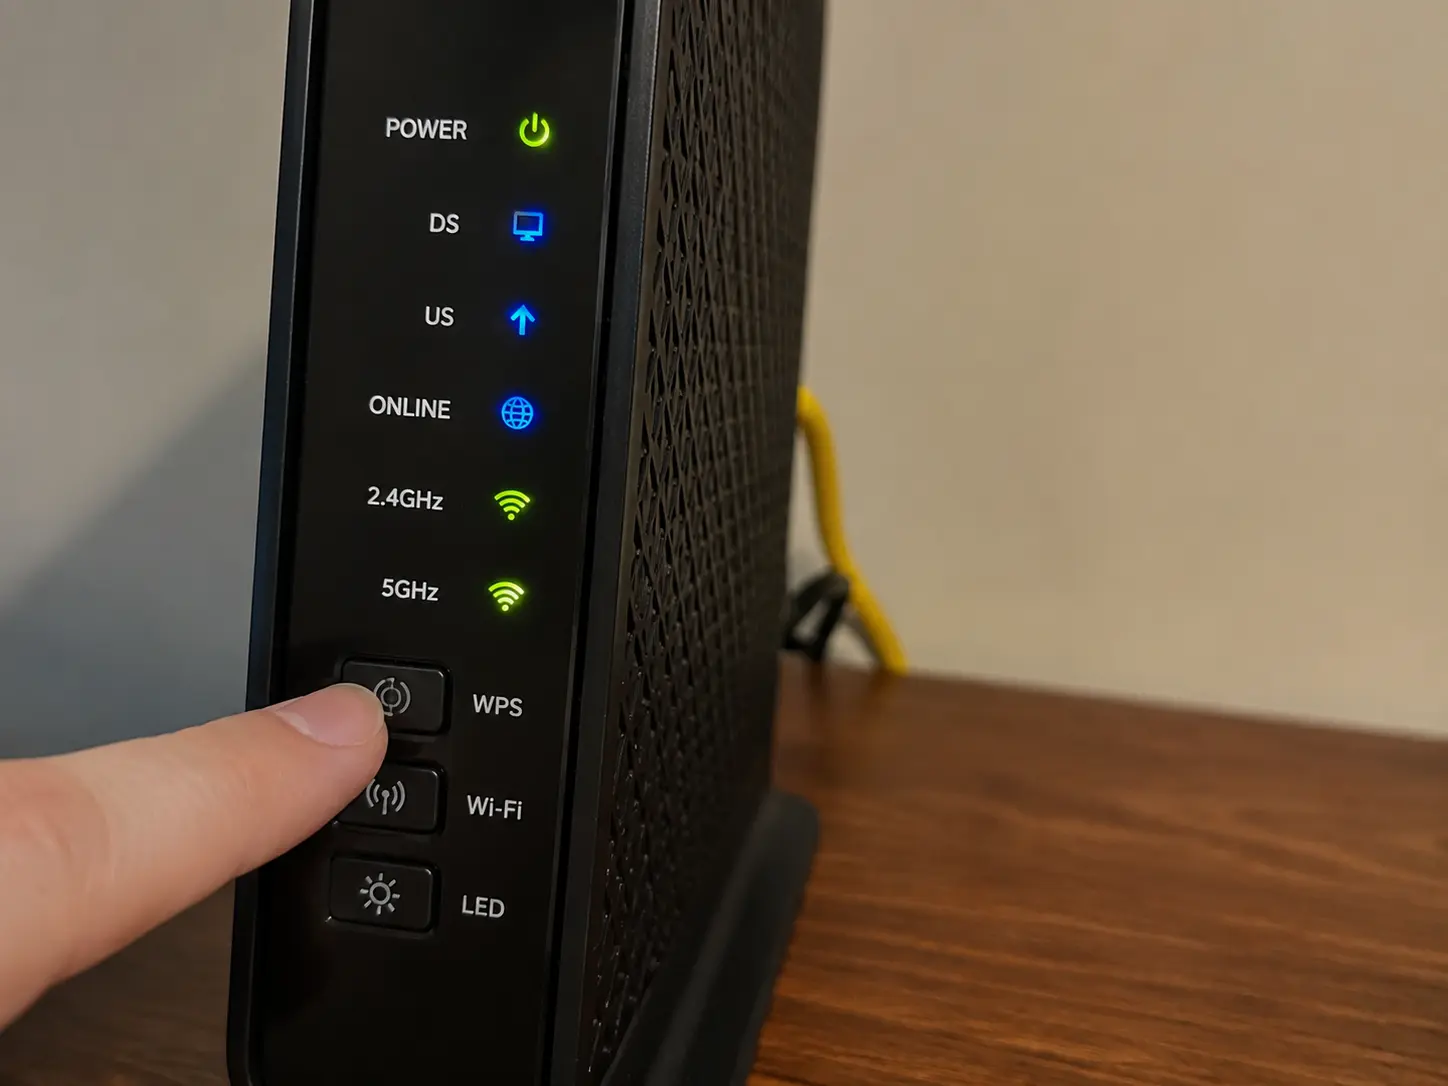
Requirements: Router must have a physical WPS button and WPS must be enabled (it's on by default on most home routers; ISP-provided routers sometimes disable it for security reasons).
Steps
- On the printer, go to Settings → LAN Settings → Wireless LAN Setup → WPS (Push Button Method).
- The printer will display a prompt telling you to press the WPS button on your router within 2 minutes.
- Press and hold the WPS button on your router for 3–5 seconds until its indicator flashes.
- The printer and router will negotiate automatically. You'll see a success confirmation on the printer screen within 60 seconds.
Important: WPS is fast, but it does have a documented security vulnerability (the PIN method, specifically). The push-button variant is considered safe for home use. If you're on a corporate network, your IT policy may prohibit WPS—use Method 1 instead.
Method 3: Canon PRINT Inkjet/SELPHY App (Best for Mobile-First Users)
Canon's official mobile app—available free on the App Store and Google Play—handles wireless setup and also lets you print photos directly from your camera roll.
Steps
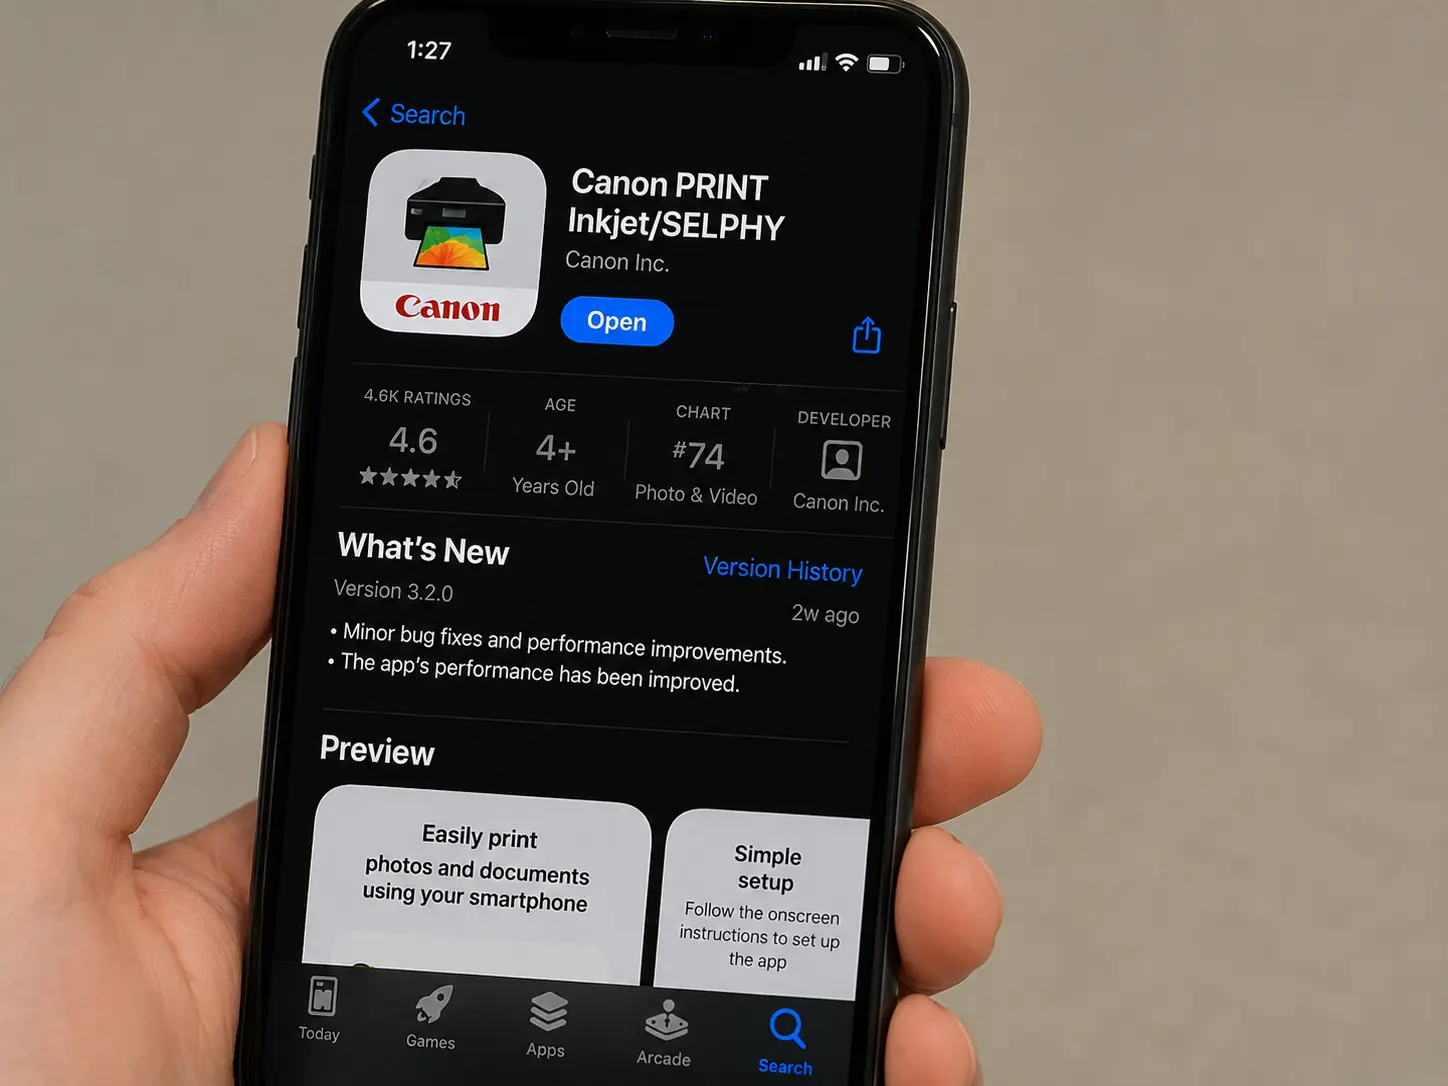
- Download Canon PRINT Inkjet/SELPHY on your iOS or Android device.
- Make sure your phone is connected to the WiFi network you want the printer on.
- Open the app → tap the + icon (top right) → Add Printer.
- The app searches for the printer. If it doesn't appear, select Set Up Printer on This Network.
- Follow the in-app prompts: the app pushes your WiFi credentials to the printer via Bluetooth or a direct WiFi handshake, depending on your printer model.
- Once connected, a test print option confirms everything is working.
Heads up: Some older Canon models (pre-2018) aren't supported by the current app version. If your model doesn't appear, use Method 1 or download the legacy Canon Easy-PhotoPrint Editor instead.
Connecting Canon Printer to WiFi on Windows
After the printer joins your network, adding it as a recognized device on Windows is a separate step:
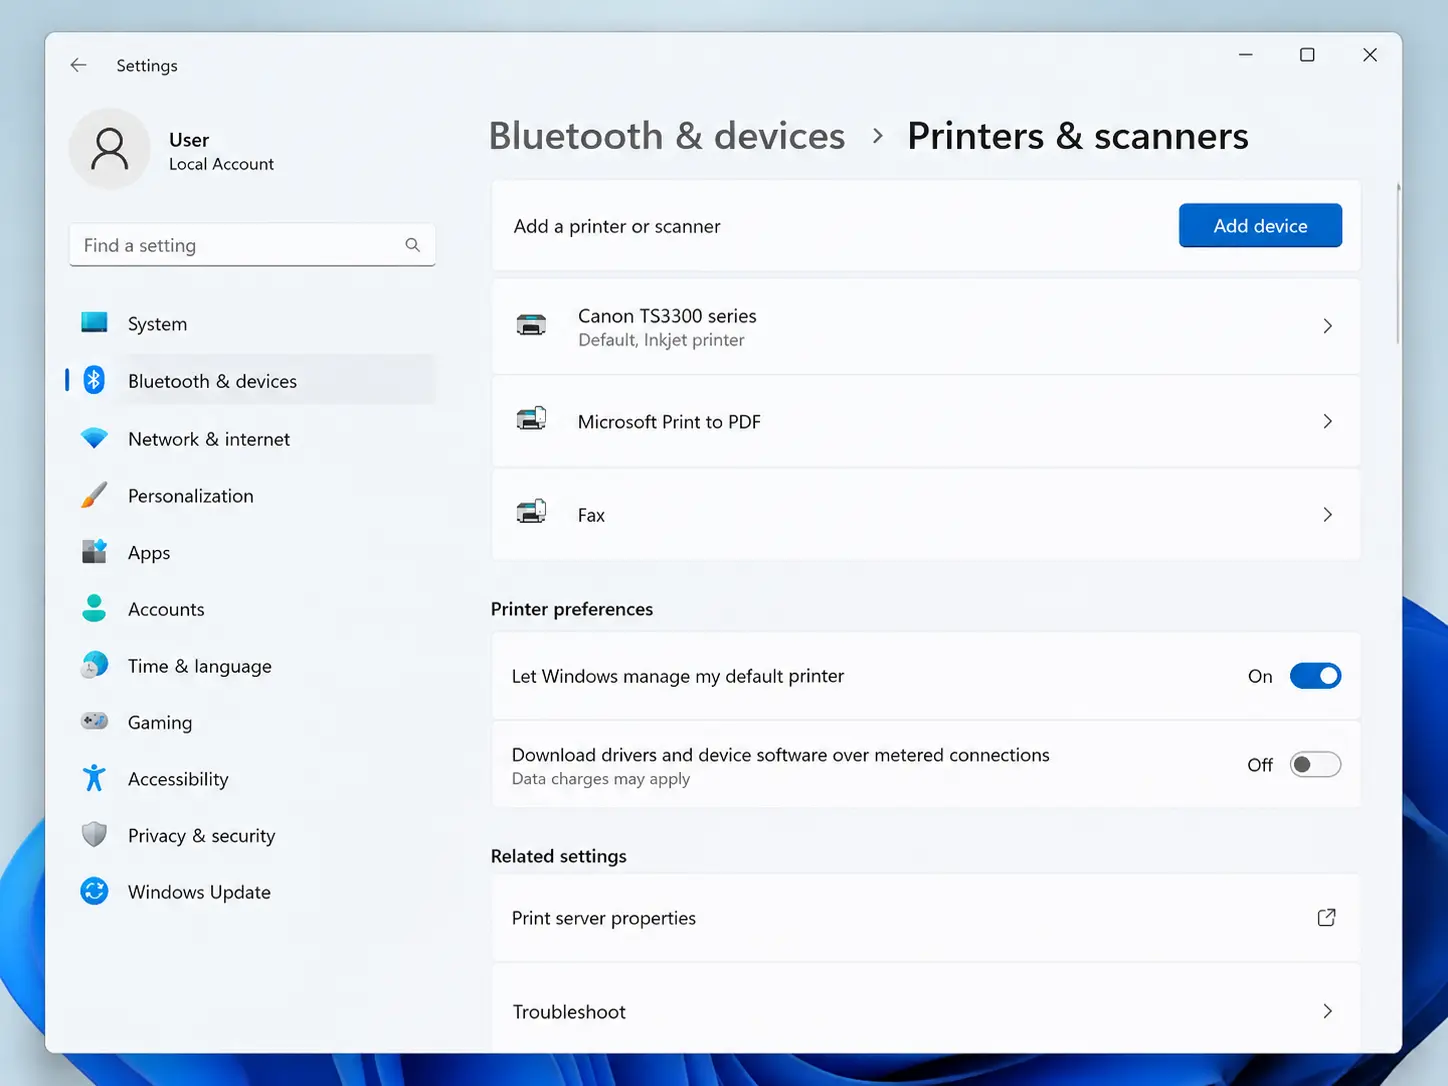
- Open Settings → Bluetooth & devices → Printers & scanners.
- Click Add device. Windows will scan your network.
- Your Canon printer should appear within 30–60 seconds. Click Add device next to it.
- Windows automatically installs the driver if you're on Windows 10/11 and have internet access. If it doesn't, download the driver from Canon's official support page using your exact model number.
Driver tip: Canon's "Full Driver & Software Package" is the most complete download—it includes the scanner driver, ICA driver, and the IJ Network Tool for managing network settings from your PC.
Connecting Canon Printer to WiFi on Mac
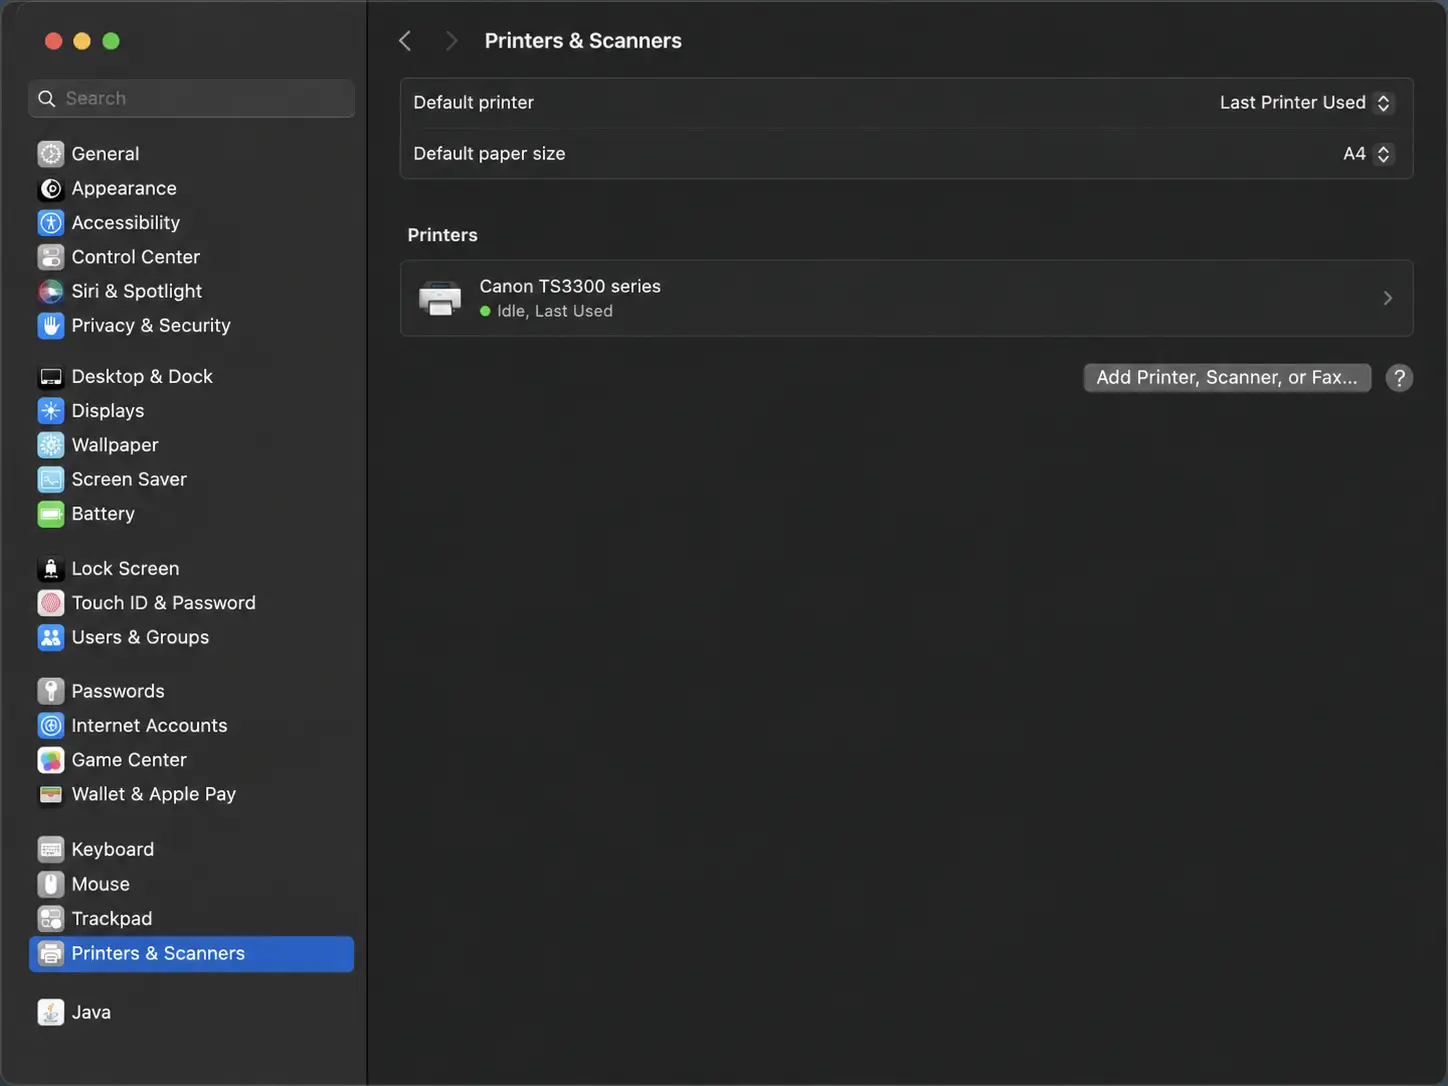
- Go to System Settings (or System Preferences on older macOS) → Printers & Scanners.
- Click the + button → your Canon printer should appear under the network printers list.
- Select it and click Add. macOS will pull the driver via AirPrint automatically for most modern Canon models.
- If you need full functionality (scanner access, ink level monitoring), install Canon IJ Printer Utility from Canon's website after the network connection is confirmed.
Troubleshooting: Why Won't Canon Printer Connect to WiFi?
These are the four most common failure points, in order of likelihood:
1. Wrong Password (Most Common)
WiFi passwords are case-sensitive. If you're entering through the printer's keyboard, double-check capitalization. Canon's on-screen keyboards default to uppercase—many people enter "password" when their actual password is "Password1!" and wonder why it fails.
Quick fix checklist:
- Re-enter the password character by character
- Check for spaces at the start or end (easy to accidentally add on touchscreens)
- If your password contains special characters like
@or#, make sure you've switched to the symbols keyboard on the printer screen - Temporarily connect a phone to the same WiFi to confirm the password works before re-entering it on the printer
2. 5 GHz vs. 2.4 GHz Band Mismatch
Most Canon consumer printers only support the 2.4 GHz band. If your router broadcasts separate SSIDs for 2.4 GHz and 5 GHz, connect the printer to the 2.4 GHz network. Connecting your phone to 5 GHz and the printer to 2.4 GHz still works fine—they're on the same network, just different bands.
How to tell which band your printer needs: Check your printer's spec sheet or the model page on Canon's website. If it lists "IEEE 802.11 b/g/n" only—without "ac" or "ax"—it's 2.4 GHz only.
How to identify your router's 2.4 GHz network: Many dual-band routers label the networks as "NetworkName" (2.4 GHz) and "NetworkName_5G" (5 GHz). If yours doesn't, log into your router admin panel (usually at 192.168.1.1 or 192.168.0.1) to check.
3. Printer Is Still in Wired Mode
If you previously used a USB or Ethernet connection, you may need to explicitly enable wireless. On most Canon models: Settings → Device Settings → LAN Settings → Change LAN → Wireless LAN.
Signs this is your issue: The printer works when plugged in via USB but doesn't appear on the network, even after going through wireless setup.
4. IP Address Conflict or DHCP Issue
If the printer connects but disappears from the network after a few minutes—or other devices can't find it even though the printer shows it's connected—you likely have an IP address conflict.
How to fix it permanently:
- Print a Network Config Page (Settings → Device Settings → Print LAN Details) and note the printer's MAC address.
- Log into your router admin panel.
- Find the DHCP reservation or "Address Reservation" section.
- Add a reservation: link the printer's MAC address to a specific IP (e.g., 192.168.1.50).
- Restart the printer. It will now always get the same IP address.
This is especially important in households with many devices—routers have finite DHCP leases, and a busy network can cause address reassignment.
Canon Printer WiFi Setup for Specific Popular Models
Canon PIXMA MG2522
This entry-level model does not have wireless capability—it's USB-only. If you bought this hoping to use it wirelessly, unfortunately the hardware doesn't support it. The PIXMA MG3620 is the wireless equivalent at a similar price point.
Canon PIXMA TR4520 / TR4522
These use the Easy Wireless Connect method via the Canon PRINT app. Press and hold the WiFi button until the lamp flashes, then follow the app prompts—the standard menu-based setup isn't available on this model.
Canon MAXIFY MB5420
Full touchscreen setup via Method 1. This model also supports IEEE 802.11ac (5 GHz), one of the few Canon consumer models that does, so you can connect it to either band.
Canon imageCLASS MF445dw
Business-class printer with an intuitive touchscreen. Navigate to Menu → Preferences → Network → Wireless LAN Settings → SSID Settings → Enter Manually for the most reliable setup path.
After Connecting: What to Check Next
Once your Canon printer is on the WiFi network, three follow-up steps improve the long-term experience:
1. Enable Canon Cloud Print or AirPrint (built into iOS/macOS) and Canon's cloud print functionality lets you print from anywhere on the network without installing drivers on every device. Most Canon printers from 2016 onward support AirPrint natively.
2. Update the Firmware: Canon periodically releases firmware updates that fix wireless stability issues. Check via Settings → Device Settings → Firmware Update or through the Canon PRINT app. A 2023 update for several PIXMA models specifically addressed an issue where printers would drop the WiFi connection after sleep mode.
3. Set Up the Printer's Web Interface Type the printer's IP address into any browser on the same network. You'll get the Canon Remote UI, where you can monitor ink levels, configure email notifications when ink runs low, and set network permissions. This is particularly useful in home offices where multiple family members print.
Related Articles
More Canon WiFi Setup Guides
Having a different Canon model? These step-by-step guides cover the most popular models people search for:
- Canon TR4720 WiFi Setup: Connect Your Printer in Under 3 Minutes — The TR4720's Easy Wireless Connect process is slightly different from the standard menu path. This guide walks through it specifically for that model.
- How to Connect Canon TR8520 Printer to WiFi? — Covers both the app-based and manual setup methods for this popular all-in-one.
- How to Get Your Canon TS702a Connected to Wi-Fi? — Covers the TS702a's specific wireless setup sequence, which skips the standard LAN settings menu.
- How to Connect Canon TS9120 to WiFi? — The TS9120 is a photo-focused PIXMA; this guide also covers connecting it to multiple devices simultaneously.
When Your Canon Printer Won't Connect
If setup didn't go as expected, these targeted troubleshooting guides go deeper than the general fixes above:
- Canon Printer Not Connecting to WiFi – Top Fixes That Work — Covers advanced fixes including resetting network settings to factory default and forcing a fresh WPA2 handshake.
- Canon Printer Showing Offline? Easy Fix for Windows & Mac — If your printer connected to WiFi but still shows as "Offline" on your computer, this is the next guide to read.
Other Canon Printer Issues
Once you're connected, these are the next most common issues Canon users run into:
- Canon Printer Error 5B00 – Reset Ink Absorber to Fix — Error 5B00 appears when the ink absorber is full. This video walks through the reset without a service visit.
- How to Fix Canon Printer Error E03, E04, E05? — The three most common Canon error codes explained, with specific fixes for each.
- Canon TR8620 Paper Jam Fix – Remove Jammed Paper Safely — Covers the hidden paper path areas most people miss when clearing a jam on this model.
- How to Fix Canon PIXMA Paper Jam Error – No Paper Inside — When the printer says there's a jam but you can't find any paper, this guide shows the two spots to check that aren't obvious.
Frequently Asked Questions
Can I connect a Canon printer to WiFi without a computer?
Yes. Use either the WPS push-button method or the Canon PRINT app on your phone. No PC or Mac required.
How do I find my Canon printer's IP address after connecting?
Print a Network Configuration Page from Settings → Device Settings → Print LAN Details. The IP address appears in the TCP/IP section.
My Canon printer was connected before but disappeared from my network—what happened?
Most likely the printer's IP address changed (DHCP lease expired and the router gave it a new one). Fix this permanently with a DHCP reservation in your router settings, or set a static IP on the printer itself under LAN Settings → TCP/IP Settings.
Does connecting wirelessly slow down printing?
Negligibly for typical documents. On a 2.4 GHz network, wireless throughput exceeds the print speed of virtually every consumer Canon printer. You'd only notice a difference printing very large files (multi-hundred-page PDFs or high-resolution photos) compared to a wired Ethernet connection.

